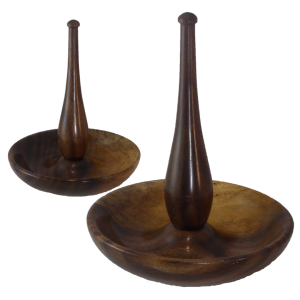
Woodturning Ring Holder – A Perfect Wedding Gift
 This video is also posted to YouTube, Vimeo, and FaceBook. Where best? Right here of course!
My nephew is getting married. What better wedding gift than a beautiful place to put wedding rings? They’ll always know where they are when not on a finger. However, I suspect my nephew’s wife with have most use for the ring holder.
As a woodturning project, this has two components: a small bowl and a simple spindle. The bowl has a hump in the center for two purposes: First to allow jewelry to not accumulate in one pile in the center. Instead loose jewelry distributes in a ring near the rim. Second, to have a little more wall thickness to support the center spindle.
The spindle is not cluttered with a lot of beads and coves. Instead it is a smooth taper to receive any size of wedding ring. Beads and coves would get in the way.
My bowl is about 4.5 inches diameter; the spindle is about 6 inches tall. The walnut is finished with lacquer and buffed to a nice shine.
Just make sure you take project pictures before you give it away.
Enjoy!
DIY Threading Jig For Common Wood
 This video is also posted to YouTube, Vimeo, and FaceBook. Same video – best right here.
I’ve been on a quest to thread wood for many, many years. I even purchased a Beall tap and die set for simple nut and bolt projects. Very NOT satisfied.
I’ve even tried to design and built my own threading jig. My problem was how to connect commercial all thread to a chuck. By the time I hired a machinist to make one, I could buy an expensive threading jig directly.
I gave up and purchase hand chase tools. However, they’re best used on expensive exotic wood that don’t quite fit my budget.
Until Dennis Paullus presented at the Utah Woodturning Symposium. His diagram included the missing link. A commercial adapter from 3/4-16tpi to 1-8tpi. I had to order the parts. This project is to successfully thread a project in gum wood.
My process:
- Prepare the box top and bottom.
- Drill out the box top. Saturate with thin CA
- Thread the female threads. Multiple light passes required until the threads are consistently peaked. If the wood is brittle and chipping, treat with with CA with each pass.
- When threads are acceptable, again treat with thin CA and make one more pass.
- Lightly sand off the threads, chamfer the front corner. Lubricate the threads.
- Estimate the size of the base tenon. From the inner diameter of the female threads, add an ample amount as the estimate.
- Prepare the tenon to this size and chamfer the leading corner. Cut a shallow valley about the width of the cutter at the base of the tenon with depth about the depth of threads. Don’t sweat it, it can be cut or refined later.
- Saturate the wood with CA as above.
- To thread, take very light passes, testing the fit with each pass until the top fits the bottom. Make one last application of CA, and take another threading pass as the same settings.
- Clean up the male threads by lightly sanding, chamfering the leading edge, and recutting the valley at the base of the tenon until the top threads completely to the bottom. Lubricate the threads
- Adjust the grain orientation if desired.
My Parts List:
- 12 Inches Allthread 3/4″-16tpi Zinc Plated – any bolt/nut supplier
- 5 3/4″ – 16 tpi Nut Zinc – any bolt/nut supplier
- 9 Inches Allthread 3/8″-16 tpi – any bolt/nut supplier
- 1 Steel Threaded Insert 1″-8tpi outside 3/4″-16tpi inside – McMaster Carr pn: 90248A088 $13.88 for 5 pack OR
- OR 1 Internal Spindle Adapter 1″-8tpi outside 3/4″-16tpi inside – Penn State pn: LA3418X $9.95
- 1 3/4″ x 3/16″ 60 Degree HSS Double Angle Cutter – MSC Direct.com pn: 03196052
- 1 Collet, 2MT, 3/8″ – Little Machine Shop.com pn: 1749
- 1 3/8″ T-nut
- 6 in. Cross Slide Vise – Harbor Freight pn: 32997
Optional
- 2 magnetic clamps – Mag Switch
- A denture brush makes a great thread cleaning tool.
Use the lathe banjo as a stop to reposition the jig between passes.
Enjoy!
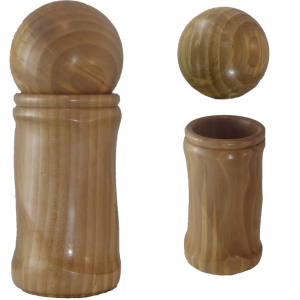
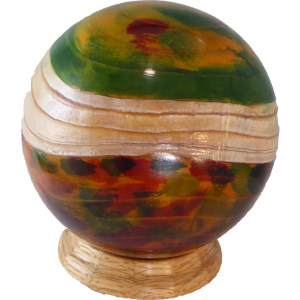
Woodturning Sphere Topped Multi Axis Box
 This video is also posted to YouTube, Vimeo, and FaceBook. But, you’re already here, so stick around.
To contribute my part to the sphere challenge and exercise a new technique, I decided to turn a multi-axis box with a sphere to serve as a lid.
The wood is gum. The box is finished with lacquer; the sphere is finished with beeswax and mineral oil mix.
For the multi-axis box, I offset both ends about 3/8 inch about 120 degrees apart. To put it in more detail, I marked lines 120 degrees apart numbering each and extending the lines across the end grain. Then I shifted the axis about 3/8 inch along line 1 at the headstock and line 2 at the tail stock. After cutting a shallow cove, I offset the wood at line 2 at the headstock and line 3 at the tail stock. Again after cutting a shallow cove, I shifted to the final numbers.
The rest is standard box making except for the lid. But for the lid, just watch my octagon video for more detail.
This is a link to the sphere challenge entry – open to everyone.
Enjoy!
Sphere Challenge of 2018 Update #1
Sphere pictures so far in the 2018 challenge. Get yours in by July 31, 2018 at www.AsWoodTurns.com/Challenges.
Rules – turn a sphere (by 7/31/18) Send it in.
Resource for you to review:
Woodturning Essentials – Octagon Method For Perfect Spheres
Woodturning A Perfect Sphere Into A Strata-Sphere
Enjoy!
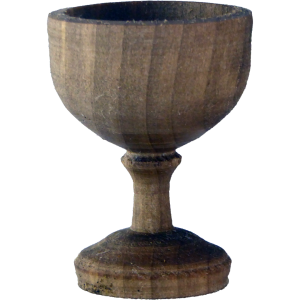
Woodturning My 5 Minute Challenge Goblet With Whoopsy
 This video is also posted on YouTube, Vimeo, and FaceBook. Best right here!
“Le PicBois” has a challenge to turn a goblet within five minutes. While I don’t like to turn as a race, I do like challenges. This one reminds me of the egg cup race at the Utah Woodturning Symposium. I’ve participated for several years. But really, I cannot do good work with a speed challenge. Yet, here I go.
My goblet is from gum from a tree cut down from my yard. In the end, the surviving goblet is about two inches in diameter and about two and a half inches tall.
Don’t delay your entry to the sphere challenge. No speed test in the sphere challenge. Enter Here.
Enjoy!
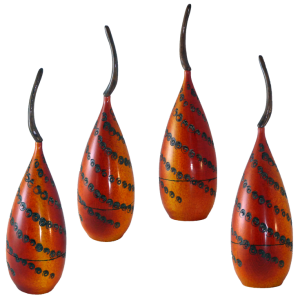
Woodturning, Burning, Coloring A Different Box Style
 This video is also loaded to YouTube, Vimeo, and FaceBook. Where best? Right here!
Our club challenged us to turn a box according to the style of Benoit Averly who demonstrated at the Utah Woodturning Symposium. His style included boxes with tall tapered lid textured and stained with a finial.
But I still like to put my own stamp on a project. Instead of texturing the entire surface with carving, I used my pyrography gear. Instead of staining the entire surface, I opted for a variegated red, orange, yellow surface.
My box is about 9 inches tall including the finial and about 2 1/2 inches in diameter. Colors are red, yellow, and black alcohol dyes. It is finished with rattle can lacquer. Red and yellow dyes were applied with a Richeson atomizer. Black dyes were applied with cotton Que-tips.
I built my pyrography power supply in a video:
The pyrography pen was built in a video:
Enjoy!
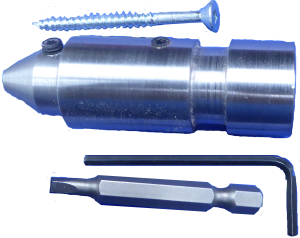
Handy Screw Chuck
 This video is also posted on YouTube. But you are already here.
I used a screw chuck from Bert Delisle to make my apple. Several viewers asked for a closer view of the chuck. With Bert’s permission, here we are.
The screw chuck consists of
- The body which is designed to be held in a standard 4 jaw chuck,
- A square drive screw
- A square drive driver
- An Allen wrench to tighten the 2 set screws.
For more information, contact Bert Delisle via email at delislebert@gmail.com
Enjoy!
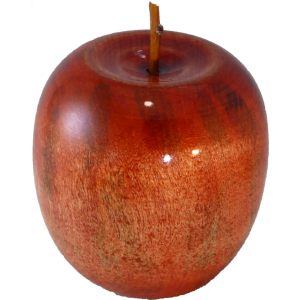
Woodturning Dye Practice – A Juicy Apple
 This video is also posted on YouTube, Vimeo, and FaceBook – Best right here at As Wood Turns!
Part of my childhood was spent on a fruit farm. We grew a lot of apples – mostly red ones.
For this project, I decided to turn an apple. Too bad it is from maple wood. One tool that makes it easier is a screw chuck provided by Bert Desilse of Alberta, Canada. It is a metal piece that it held in place by standard chuck jaws. It contains a replaceable square drive screw that is held in place by a square drive bit. A very nice design.
For color, I used alcohol based red, green, and yellow dyes applied with cue tips and a Richeson atomizer. I sanded back much of the dye to blend it together and allow a mottled final color. When completed, I sprayed it with rattle can lacquer.
Enjoy!
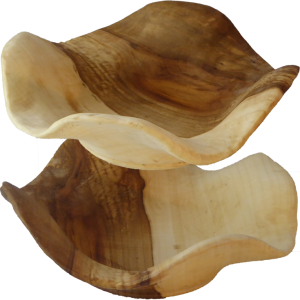
Woodturning Wavy Flower Bowl Inspired By Ceramic Display
 This video is also posted on YouTube, Vimeo, and FaceBook. And, of course, right here at As Wood Turns.
This project is inspired by a wall display at a hotel. The display looked like a field of flowers. My thought upon seeing the display – What can I do that is similar?
Here it is, a maple bowl with a wavy rim that makes a strong resemblance to a flower.
The major change is to leave a very thick rim that I could carve into a random wave.
My maple bowl is about seven inches diameter and about two inches thick.
Enjoy!
Your Woodturning Challenge – Turn A Sphere
 This video is also posted on YouTube.
I challenge every woodturner to turn a sphere by the end of July. Spheres are an essential skill. If you are a beginner, begin now. If you are experienced, get better now.
What kind of sphere? As long as it is or uses a sphere, anything goes. Between a challenge and a theme, I expect to see some great talent.
When finished, upload one still picture to www.AsWoodTurns.com/challenges by the end of July.
Resources for you to review: (click to follow link)
- Woodturning Essentials – Octagon Method For Perfect Spheres
- Woodturning A Perfect Sphere Into A Strata-Sphere
Enjoy!