How To Turn Perfect Hollow Sphere – No Jig
 This video is also posted on YouTube, Vimeo, and FaceBook. Best right here!
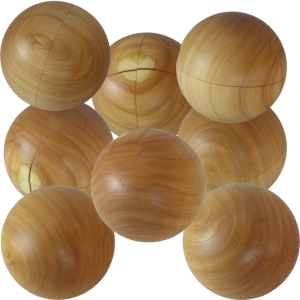
I’ve turned many spheres and have combined two techniques to make them perfect without a jig. But at a club demo, I was challenged to turn a hollow sphere. My response – sure. But, here’s the proof.
Using the process, I’ve described in previous videos, the only difference is to stretch out the center of the sphere while still an octagon. In this case, I hollowed the sphere, then glued it back together again. Similarly, I could create friction slip joint or thread the joint. After gluing or joining the halves back together, continue the process from where it was interrupted.
My hollow cherry sphere is 3″ diameter. It weights 75 grams = about 63 grams less than a similar solid cherry sphere. The finish is beeswax and mineral oil.
For basic sphere turning, please see my video – Woodturning Essentials – Octagon Method For Perfect Spheres
Enjoy!
How To Hollow A Tall Thin Cherry Vase
 This video is also posted on YouTube, Vimeo, and Facebook. But you’re already here!
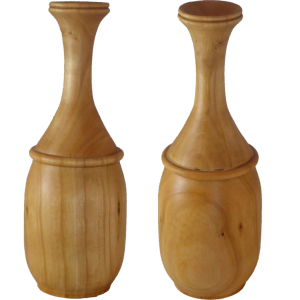
For this video, I wanted to combine two useful techniques. First, to rough turn a green wood project, seal it, and let it dry. The second, to split a project in half and hollow from the middle out to both ends.
I became impatient with the locust wood I had selected. So, I substituted some green cherry that I rough turned into a billet two years ago. So this is a modified first objective.
After roughing out the vase, I parted it in half. Then since it was already dry, I proceeded to hollow both the lower section and the upper section. Since it was now already dry, I then glued the two pieces back together. Then proceeded to finish my cherry vase. My vase is three inches diameter and seven inches tall finished with walnut oil.
Enjoy!
Poplar Dinner Plate For Club Challenge
 This video is also posted to YouTube, Vimeo, and FaceBook. Best right here!
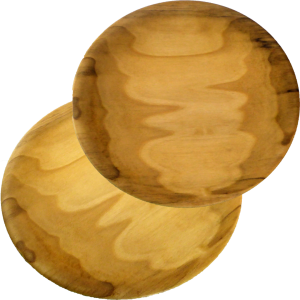
I turned this dinner plate for our club challenge. Although I thought I had selected rough sawn red oak, it is actually poplar when smoothed out.
My eight inch plate is finished with walnut oil so that it could be used for food. Walnut oil can also be renewed easily after use. I did my best to make a smooth bottom and a minimal mounting mortise. I do not appreciate turnings with a deep mortise on the bottom. To me, they seem heavy and clunky since the wall thickness is excessive.
Enjoy!
This “Columbus Egg” Stands Up When It Spins
 This video is also posted to YouTube, Vimeo, and Facebook. Best right here!
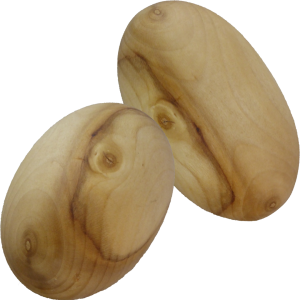
According to Wikipedia, “An egg of Columbus or Columbus’ egg refers to a brilliant idea or discovery that seems simple or easy after the fact. The expression refers to an apocryphal story in which Christopher Columbus, having been told that discovering the Americas was inevitable and no great accomplishment, challenges his critics to make an egg stand on its tip. After his challengers give up, Columbus does it himself by tapping the egg on the table to flatten its tip.
While that story describes many other discoveries, it definitely applies to this egg. I did not know that I could spin an egg and have it stand up. However, after having been introduced to the concept and told the simple formula… Well, duh! Anyone can do that.
For this woodturned egg, the secret is to apply the golden mean. Turn a cylinder and measure the diameter. Mark the length to be 1.618 times the diameter. Then gently round over the ends.
I chose walnut oil for a finish since it will take abuse and can be renewed after children have had their fun.
My egg is about 3 inches long of Linden wood. I’ll let you figure out the diameter. Duh!, anyone can turn this egg.
Enjoy!
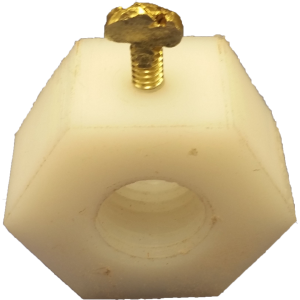
DIY Flange Nut Alternative With Set Screw
 This video is also posted to YouTube, Vimeo, and FaceBook. Best right here!
I asked other woodturners in my club how to solve a particular problem. Several had machining background. Their recommendation was to obtain a flange nut then drill and tap for a set screw in the side. Essentially, a flange nut incorporates a washer with a nut as one unit. The set screw locks it in place on the bolt. A brass or nylon set screw does the job without damaging the threads on the bolt.
The only problem was that 1″-8 tpi flange nuts are rare and expensive. I decided to make my own from HDPE, High Density PolyEthylene using a 1″ spindle tap. But instead of a round portion for the flange, just make the nut oversized in a hex nut shape.
I could not find a brass set screw locally. Instead I obtained a brass bolt and hammered the head into sort of a thumb screw shape.
As you’ll see in the video, this worked out well. Now I will used the flange nut to see if an experiment with my threading jig works. More on that later.
Enjoy!
Woodturning Two Bowls, One Disaster, Two Final Results
 This video is also posted on YouTube, Vimeo, and FaceBook. But you’re already here!
I’m extremely disappointed (to say the least) when a bowl cracks. It’s bad enough if it cracks while drying. But it is even worse if it cracks while I’m working on it. In this case, it cracked during sanding.
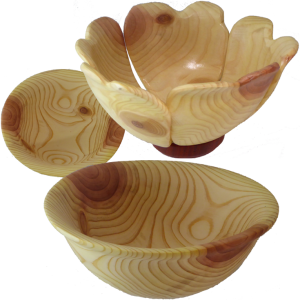
In my period of despair, I turned another identical bowl from the same sequoia. I had time to think about the broken bowl. After weighing alternatives, I decided to cut it up to make flower petals then reassemble it into a flower bowl.
After cutting the bowl into five petals, I temporarily screwed each petal to a cylinder base while I dabbed quick epoxy into the middle. After three applications, the petals were secure and I removed the screws. What them remained was to turn and fit a center to cover the epoxy and a new base to cover the ugly poplar I used for the glue up.
Both bowls are about 8 inches in diameter of sequoia and padauk. The solid bowl is finished with walnut oil. The flower bowl is finished with rattle can lacquer.
Enjoy!
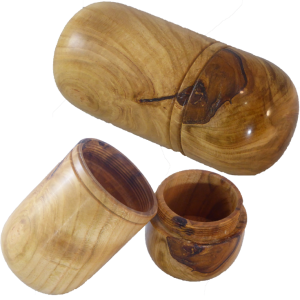
Woodturning Threaded Cherry Pod From Green Wood
 This video is also posted to YouTube, Vimeo, and FaceBook. But, you’re already here!
I rough turned this cherry five years ago. At that time, it was freshly harvested. I turned the cylinder, cut tenons on both ends, and parted it in half. Then I had some good hollowing practice as I hollowed both pieces way too much. I then sealed the wood and taped the two pieces end to end and put them away to dry. The tape was supposed to keep the two pieces together over the years. It did not otherwise help the drying process.
Now the wood is dry and distorted. I have to refresh the tenons and true up both the interior and exterior. Since I recently completed my threading setup, I decided to thread this box. For threading, please watch this video.
Years ago, I made a mistake when I hollowed the wood. I cut the hollows way too deep. I left too little wood at the base for a good top and base. So for this, I decided to make a pod. A pod does not have to stand up. It can lie on its side. Since the box is threaded, the two pieces will not come apart.
My 5 x 2 inch pod is finished with lacquer buffed to a nice shine.
Enjoy!
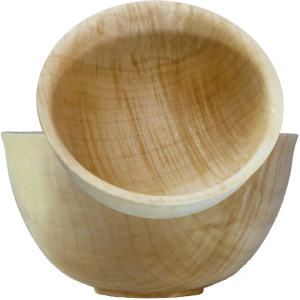
Woodturning Figured Maple Rough to Finished Bowl
 This video is also posted to YouTube, Vimeo, and FaceBook. But you are here already!
I rough turned this bowl in April of this year. I had intended to show the video for the rough turning. Alas, when the time came, the video could not be found.
That aside, this maple was green or wet last April. After rough turning, I coated it with Tree Saver a green wood sealer and put it away. A few weeks ago, I felt it was a lot lighter and brought it into the house. Then every week or two, I weighed it and recorded the weight. It actually gained a few grams after coming inside. Yep – it is dry.
This wood came from our club wood raffle. I was told it was silver maple. It is beautiful with a lot of figure. Finished, it is about 6 x 3 and finished with walnut oil with no buffing.
Enjoy!
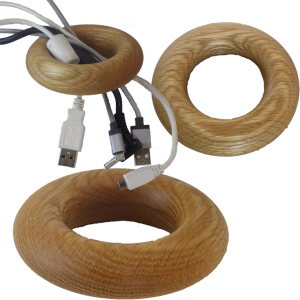
Woodturning Cable Keeper – Simple Look – ?? Execution
 This video is also posted to YouTube, Vimeo, and FaceBook. But why go anywhere else – You’re already here.
I had an idea to make a cable keeper – the doodad that manages computer cables. But what is a wood turned cable keeper?
First decision is to make the hole big enough for an electrical plug – so how about 1.75 inches. Then, is the hole offset from center – a multi-axis turning? If not, how to mount it since there are no disctinct corners to hang on to.
My cable keeper is ash about 4 inches in diameter finished with walnut oil.
Is it simple? Is it difficult? How to mount this wood? Is this worth a video?
Enjoy!
Sphere Challenge of 2018 – Final
I challenged woodturners to turn a sphere by the end of July. Why? Because spheres are an essential skill. I received some training years ago that just did not work. It took me years of false starts to turn my first good sphere. Since then I’ve learned and shared the techniques and process that works for me and for anyone wanting to turn a sphere. As a plus, no expensive jig is required.
Here are the results of the challenge. This is great work that I find inspirational to me. I trust you will find inspiration also.
Resource for you to review:
Woodturning Essentials – Octagon Method For Perfect Spheres
Woodturning A Perfect Sphere Into A Strata-Sphere
Enjoy!