Woodturning Quick and Easy Padauk Plate
 This video is also posted at YouTube, Vimeo, and FaceBook – Where Best? Right Here!
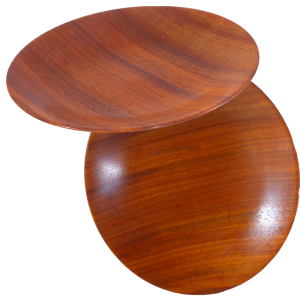
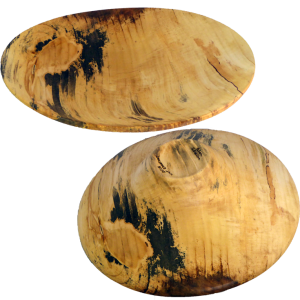
This piece of padauk has been bothering me. It is an offcut from a previous project. I’d like to use it for a segmented project but it is not enough. Finally, I decided to turn a small plate. The padauk is perfect!.
The plate is 7″ diameter finished with lacquer and buffed to a nice shine. BTW, I kept the mounting mortise to about 3/16″, the deepest I would every allow.
This is a quick and easy project. What are your quick and easy projects?
Enjoy!
Resources
- Respirator
- 3M Half Facepiece Reusable Respirator 6200/07025(AAD), Respiratory Protection on Amazon
- Filters
- Advanced Particulate Filter 2291, P100 Respiratory Protection on Amazon
- Home Made Vaporizer for “Pyrography”/Woodburning
- DIY Pyrography Pen And Tip For My Woodburning
Final Woodturning Matching Green Cored Bowls
 This video is also posted to YouTube, Vimeo, and FaceBook. Best right here!
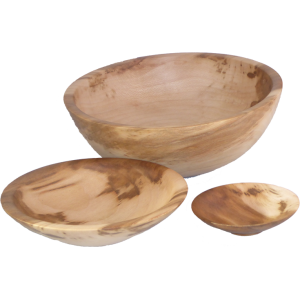
I took a training class at Craft Supplies almost two years ago. During the class, I did a couple of coring projects with the Kelton McNaughton Center Saver System. At that time, I cored two sets of matching bowls from sycamore. I then painted the rough bowls with Tree Saver Green Wood Sealer, brought them home and let them dry. They are definitely dry now – I don’t need to weigh them.
A viewer asked a question, “How to you remount a cored bowl that does not have an original center”. A perfect excuse to rescue those bowls from the drying rack.
In this video, I used two different ways to center the blank. In the end, I recommend the later.
First, obtain a piece of clear acryllic from your store a little bigger than the largest bowl you expect to turn. Find the center and mount the acryllic to a faceplate. Stretch some masking tape from the center to the perimeter so marks can be made every inch. With your favorite point tool (skew) scratch concentric circles at one inch increments. Drill a hole in the center big enough for your pencil (1/4″) then drill holes at each ring preferable in a straight line to the perimeter at each ring.
This center finder can be used many ways. In this case, I want to find an optimum center of the warped bowl. Use the center hole to mark it.
But, as I explain in the video, precision may not be necessary. A green bowl shrinks across the grain, often unpredictably. The bowl walls are thick to allow wood to be cut away. Hopefully, they are thick enough to allow some deviation from a “true” (whatever that is) center.
My sycamore bowls are 10+, 7, and 4 inches diameter and 4, 2, 1 inches tall, finished with walnut oil.
Enjoy!
Resource Links
Home Made Vaporizer for “Pyrography”/Woodburning
DIY Pyrography Pen And Tip For My Woodburning
Woodturning & Hollowing A Vase – Not Through This Neck
 This video is also posted to YouTube, Vimeo, and FaceBook. But best right here!
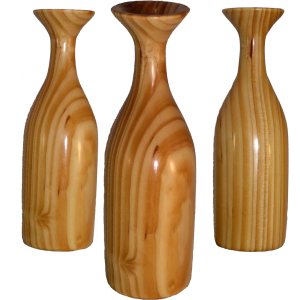
Why hollow through a tiny hole if you don’t have to. For this long neck vase I hollowed it from the bottom then plugged the hole with matching wood.
Watch out for hanging out so far from the spindle. I used my DIY steady rest to stabilize the long spindle.
My cedar was harvested near Portland Oregon. An arborist identified it as Titan Cedar, a close relative of biblical cedars of Lebanon.
My vase is about 2 inches diameter and 8 inches tall finished with lacquer buffed to a high gloss.
Enjoy!
Resources
Home Made Vaporizer for “Pyrography”/Woodburning
DIY Pyrography Pen And Tip For My Woodburning
Update To My DIY Lathe Steady Rest
Woodturning Giant Tagua Miniature Vase
 This video is also posted to YouTube, Vimeo, and FaceBook. – Best Right Here!
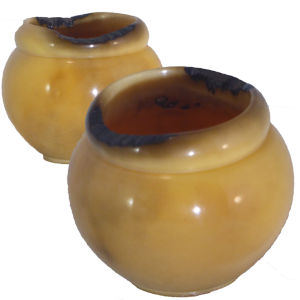
After I turned a miniature vase from tagua a year ago, a viewer, Terry, gave me a bag of giant tagua nuts at last year’s Utah Woodturning Symposium. I did not know tagua nuts could be this big. I wish I knew where to buy more.
This tagua vase is about 2 inches in diameter. No finish is necessary after fine sanding and buffing. Following tagua tradition, I left a bit of natural edge.
Enjoy!
My steady rest:
Update To My DIY Lathe Steady Rest
Woodturning Green Chestnut Bowl – Hoping For It To Warp
 This video is also posted to YouTube, Vimeo, and FaceBook. Best Right Here.
I want to turn this green chestnut to a somewhat different style that I saw recently at a club demo. This bowl does not require a constant wall thickness.
Since it is green, I expect it to warp and I hope is has significant warping.
The bowl is about 10 inches diameter and 3 inches high. Walnut oil provides a renewable finish.
I wish it would warp even more.
PS. The demo was by Paul Russell. I had him critique this piece to compare it to his demo. He did a 20 inch piece – mine is 10 inch. He suggested a more shallow cove in the top, thinner wall, and shorter foot. Now I need to try it again. 🙂
Enjoy!
Woodturning Olive Vase – What to Teach a Novice?
 This video is also posted to YouTube, Vimeo, and FaceBook. Best right here at As Wood Turns.
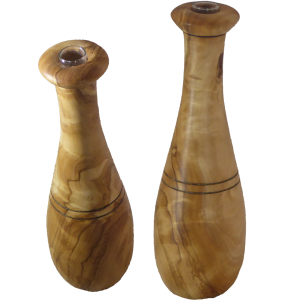
For this project, I’m preparing for a fiend’s daughter to come have a first experience with woodturning.
This is a small 5″ vase from semi-dry olive wood finished with beeswax and mineral oil. A small glass insert protects the wood from moisture (somewhat).
What projects do you think are good for a teenage beginner?
Enjoy!
Do Not Let Your Spouse See This Woodturning Present
This video is also posted to YouTube, Vimeo, and FaceBook. Best right here at As Wood Turns.
My wife convinced me to purchase a SawStop table saw. I guess she wants me to keep all my fingers. My previous saw was a vintage Craftsman table saw. Years ago, I had purchased an Incra rip fence for it which has worked well. The saw’s mobile base had worn out and replaced with a wooden base with casters. The new base was longer to also support the Incra fence support which had repeatedly bent.
Wanting to keep the Incra fence instead of the expensive SawStop rip fences, I decided to swap the saws but keep everything else.
One major item was the extension tables on the SawStop. The Craftsman extension tables were reinforced and solid. The SawStop extension tables are flimsy without their rip fence rails. This problem was solved with wood pieces that bolt to the Incra fence rails and the extension fences.
The other big deal is the miter gauge slots that are both further away from the blade on the new SawStop. I rely on a cross cut sled to safely and accurately make cross cuts. I have to move the strips or remake the sled.
I trust these are good decisions that will serve me for years to come.
Enjoy!
Woodturning Candy Cane Tree Hanger – A Sweeter Ornament
 This video is also posted to YouTube, Vimeo, and FaceBook. Where is it best? Right here, of course!
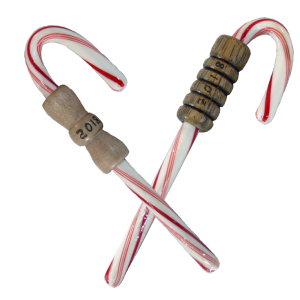
One of these Christmas ornaments is simple and quick. However, when given to children, there has to be enough to go around. That is the complication!
Each is about 2 inches long and about 5/8 inch diameter. A 3/8 inch hole holds the sweeter part – the candy case. Lacquer was my preferred finish for these. The is a variety of pen blanks from a “Tropical Hardwood” bundle.
Enjoy!
Christmas Ornament Challenge – 2018 Results
This video is also posted to YouTube – What go there when you’re already here?
Results are complete for the 2018 Christmas Ornament Challenge.
Finalists are:
# Maker Title
2 Eli Polite Expert Impossible
69 Pedro Trinidad Novice Tres Reyes Magos
9 Jim Beckwith Confident Carved Cherry Sea Urchin Ornament
68 Gene Dellinger Novice Pierced Hollow-Form with LED Candle
5 Mauro Migone Confident Hollow Sphere Ornament
44 Larry Lemon Expert 16″ Nutcracker
20 Grant Christiansen Confident Nativity Ornament
29 Seth Miller Novice Ohio State Permanent
32 Bert Delisle Confident Nativity scene
15 Martin Young Confident 3 Stripes
19 Rick Morris Confident Bowl, with Christmas Trees
33 Darryl Jones Expert Colored Pencil Ornament with Dyed Maple Finial
38 Rod Jewell Confident Fire of the Spirit
Enjoy!
Woodturning Simple Quick Ornament From Scrap
 This video is also posted to YouTube, Vimeo, and FaceBook. Where Best? – Right Here!
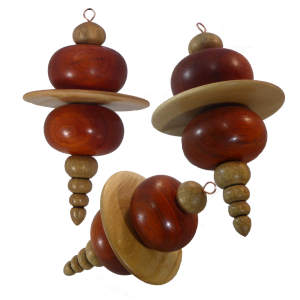
This Christmas ornament is simple and quick. It is made from leftovers and a tropical pen blank. The round pieces are padauk. The disk is ash. It is finished with shellac friction polish. It is about 2.5″ by 4.5″.
Enjoy!