Another Easter Egg (Or Puzzle) For The Easter Bunny
 This video is also posted to YouTube, Vimeo, and FaceBook. Where is best? Right here already!
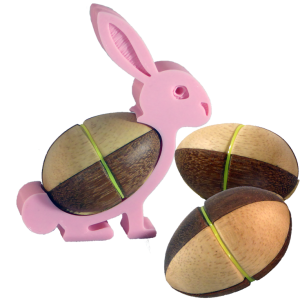
After turning the solid egg is the last video, I wondered what other types of Easter eggs could I make for my 3D printed Easter Bunny.
This Easter egg is hollow for a small treat inside. A rubber hairband holds it together since the joints are along the long section of the egg.
To make this egg:
- Tropical hardwood pen blanks are glued together with paper joints.
- Turn the egg. Remember than an ideal egg’s length is 1.29 x its diameter and the big end is a hemisphere.
- Cut a shallow groove at the middle of the egg for the rubber hairband.
- Sand and finish
- Using a Dremel tool with a small burr, grind out the wood to hollow each piece.
- Gently sand off any remaining paper.
Remember that you can find a 3D printer at a public library. The STL pattern file is available from Thingiverse.
The perfect egg is reviewed in this video. (Woodturn My Eggs Easy Over Please).
However, while we’re having some Easter fun, please also remember the true reason for Easter.
Enjoy!
This Easter Bunny Brings Sweet Chocolate or Wood Eggs
 This video is also posted to YouTube, Vimeo, and FaceBook. Where Best? Right HERE!
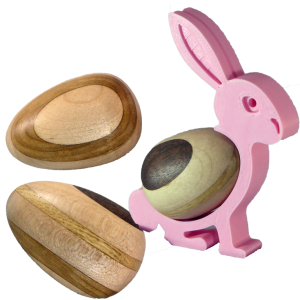
At the Maker Space in the local public library where I was 3D printing another project, I saw a cute rabbit holding a foil wrapped egg. My immediate thought was to have the little bunny hold a wooden egg that I have turned.
I managed to obtain one from the library then went home to turn the egg. The wood is a left over lamination. In a video a couple years ago, I presented what someone termed the perfect egg. (Woodturn My Eggs Easy Over Please.
The bunny rabbit is 3D printed using a pattern from Thingiverse. Many public libraries have Maker Spaces or equivalents with a 3D printer for public use.
In summary, a perfect egg has a bottom that is a perfect hemisphere. Therefore, the distance from the big end to the widest part of the egg is 1/2 the diameter. The overall length of the egg, as specified in that article is 1.29 times the diameter. Blend the two together for a perfect egg.
However, I don’t believe I’ve ever noted a “perfect” chicken egg. Further, I have noticed that other species’ eggs vary even more. But at least, this measure gets me close.
After finishing the egg, set it on the bunny rabbit holder.
Enjoy!
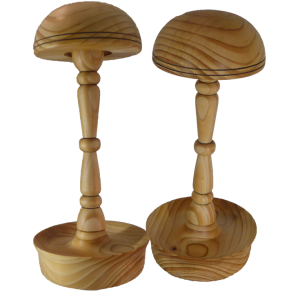
Woodturning Wig Stand For Cancer Patients
 This video is also uploaded to YouTube, Vimeo, and FaceBook. But you’re already here at As Wood Turns.
The Utah Woodturners club has a summer activity from April through October where we get together at someone’s shop on one Saturday morning each month. This is a great time to observe and share. We’ve fixed lathes, solved tough problems, and shared experiences.
This year, we’ll add a service project to enhance the other activities, wig stands for future cancer survivors.
While your mileage my vary from this one. This wig stand uses 5″ 8×4 cedar for the dome top; 6″ 8×4 cedar for the base, and 12″ 5/4 cedar for the center spindle. Mine is finished with walnut oil. It will not make it to a end user until the oil has fully dried.
While a wig stand will not relieve their current pain, hopefully, it can help them deal with their emotions.
Enjoy!
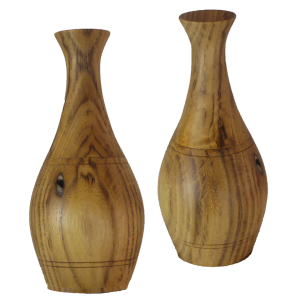
From Green Firewood to Vase – Deep Hollowing Wet Wood
 This video is also posted to YouTube, Vimeo, and FaceBook. Where Best? Right here!
This black locust wood came from my brother in Idaho. It was freshly cut. I took it home and promptly rough turned it to a cylinder, then a rough shape for a vase, then parted it in two. Each end was hollowed before coating it with Bowl Saver, a green wood sealer from Craft Supplies USA.
After a couple of months, I weighed each piece and recorded the date and weight on the wood. When the last weight was equal or higher than the previous weight, I figure the wood is dry.
I remounted each piece truing the tenon, finished hollowing each piece before fitting the top back to the bottom and gluing it together.
After final shaping and sanding, I disguised the joint with a fine shallow groove. To disguise that groove, I added another nearby then another pair near the bottom of the vase.
This vase is about 6″ tall and 2.5″ diameter, finished with walnut oil.
Enjoy!
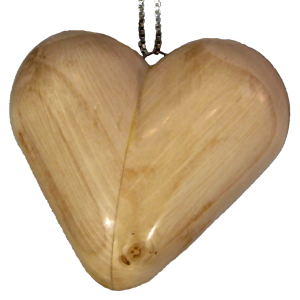
Revisit Woodturning Heart For My Valentine Plus Collet & Jig
 This video is also posted to YouTube, Vimeo, and FaceBook. Where Best? Right here!
After turning my Valentine’s heart, I decided I needed to refine my process for this type of project. Thank you for all your suggestions. The differences are a bandsaw sled; a collet; hollowing the heart.
Key to the bandsaw sled are elevator bolts. Elevator bolts are better for woodturning jigs because they have a large almost flat head that works better for MDF because they will not pull through the MDF as easily. I’ve also tried hex bolts, carriage bolts, and toilet bolts. The elevator bolts work much better and are not expensive.
The exact dimensions for the band saw sled are not critical. It needs a board to ride the miter slot in the band saw, a board to set the cut angle, and a hold down. With small adjustments to the actual project, it worked well. I felt much safer and out of danger.
The collet is modeled after metal working collets but use a woodturning chuck for clamping pressure. This design can easily be made in most wood shops. Best of all it is not expensive; it is easily adapted to different sizes of spindles. If it is damaged, no problem, throw it away and make another.
The collet is used to hollow the spindle from the middle and to trim the ends. If the fit is too loose, simply sand the collet faces to obtain a perfect fit that does not damage the spindle.
Now my wife has two different hearts for her choice for her necklace. The wood is some variety of Gum.
Enjoy!
Woodturning Green Chestnut Bowl – Stitched & Revisited
 This video is also posted to YouTube, Vimeo, and FaceBook. Best Right Here!
After turning a green chestnut bowl a few weeks ago in a style new to me, I had the chance to have feedback from Paul Russell, who had demonstrated it. I wanted to know why the green wood had not warped into a wavy rim like his had.
After receiving the feedback, I turned another thinner, smaller base, and more shallow. I was still disappointed in the amount of warping.
I still had a slice off the same block, so I tried again. Much to my dismay, the chestnut was not strong enough to turn that thin. It split into two pieces and another partial crack.
Do I throw it into the fire? No, I used blackened copper wire to stitch the two pieces together.
Maybe not as wavy as I wanted. But it definitely has a story especially when placed with the other two similar bowls from the same block of wood.
Enjoy!
Woodturning Basic Skill Demo Box With Near Suction Fit
 This video is also posted to YouTube, Vimeo, and FaceBook. Best Right HERE!
My brother came for a visit and wanted me to demonstrate woodturning a box. I would rather have coached him to turn the box. However, that is all he had time for.
An end grain box is always a good project with lots of potential. Boxes can be both useful and pretty. Many woodturners aim for a suction fit at the joint between the top and the bottom. While this fit may demonstrate skill, the end owner of the box then often must use two hands to open the box. I prefer to make a tight fit to aid in turning the box but relax the fit just before finishing.
The basic process is:
- Mount wood between centers and round off the wood.
- Cut tenons on both ends of the box to fit a scroll chuck.
- Mount the wood in the chuck, true the rough rounding, and part off the top from the bottom at about 66% of the height, allowing for a tenon.
- Mount the lid in the chuck, hollow, and cut a mortise ensuring the sides of the mortise are parallel.
- Sand and finish the inside of the lid.
- Mount the bottom in the chuck and cut a tenon to fit the mortise on the lid. Sneak up on the fit. If the fit is too loose, waste off the tenon and try again.
- Place the lid on the base, position the live center for security, and shape the exterior.
- Sand and finish the lid.
- Sand and finish the base.
- Relax the joint between the lid and the base.
- Reverse the base into a chuck for a jam chuck.
- Finish shape the bottom, sand and finish.
Once the basic process is mastered, many variations and refinements are possible. Wax is a great finish for the interior to avoid trapping strong odors that will persist for a long time.
I prefer finishes that can blend together as the box is finished in stages. These are generally, wax, oils, shellac, or lacquer. Finishes that do not blend well are surface films such as polyurethane or stains.
Enjoy!
A DIY Approach To Waterproof Wood
This video is also posted to YouTube, Vimeo, and FaceBook. But, you’re already here!
At last fall’s Segmented Woodturning Symposium, I had a discussion with Joe Schlawin. He suggested that acrylic plastic could be used to waterproof certain woodturnings. I needed to know how a solid sheet of acrylic plastic could waterproof the inside of a vase.
It turns out that acetone can dissolve acrylic. It takes some time but acetone can dissolve the plastic.
For this project, I broke up some acrylic into small pieces with pliers. I had to wear my full face shield. The pieces tended to shatter a fly away including at my face. I put about 3/4 inch of small pieces in a pint glass jar with a metal lid. Over the next two weeks, I stirred the mixture and added more acetone. I was amazed when the acrylic changed to a thick syrup. I added more acetone to thin it down.
For the test, I hollowed four cups from cedar. Two of them, I painted the inside only with the syrupy acrylic. It dried hard within a couple of hours – I did not constantly watch them. After drying, I did not detect an unusual odor other than the cedar scent.
Each cup was filled with water and a few drops of red food color. Within minutes, the uncoated cups leaked. One coated cup showed no color on the outside. One coated cup showed color but I think that come over the lip when I moved it.
I have yet to test this process on the outside of a project. But I like what it did so far to the inside.
Is this mix “Food Safe”?
In our current legal environment, it will be difficult to get anyone to say “Food Safe”. You will have to make up your own mind.
However,
- Please google acrylic and food safe. if you follow the same threads that I did, you’ll see that acrylic is okay.
- Acetone is very flammable therefore very volatile and evaporates quickly. It is a common solvent. If you google it, you may find that certain levels are common in the body and higher if someone is on a Keto diet. Acetone is a common ingredient in paint.
- Very little acetone will remain in the finish when dry. The key will be letting it dry enough for you to be comfortable.
So. that is a very long winded way to say that you have to make up you own mind after your own research.
Enjoy!
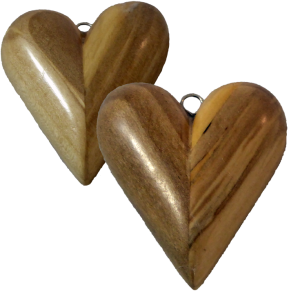
Woodturning Heart For My Valentine Plus A Collet Flop
 This video is also posted to YouTube, Vimeo and FaceBook. Except that you’re already here!
This is an early release for Valentine’s Day. I turned this hazelwood heart for my wife. It is turned from a 7/8″ cylinder which is then sliced at a steep angle. The two parts are then rotated and reglued to form a heart.
In the process, I tried to make and use a wooden collet to hold the cylinder. The wooden collet is modeled after steel collets used in metal working. My collet failed but I think the concept could be useful in woodturning. Please view this video and add your suggestions.
Happy Valentine’s Day.
Enjoy!
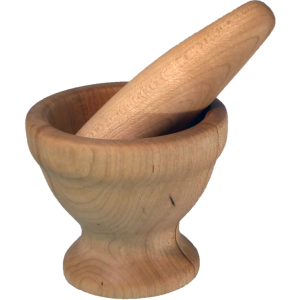
Woodturning Maple Mortar and Pestle
 This video is also posted on YouTube, Vimeo, and FaceBook. However, you’re already right where you need to be.
A mortar and pestle has been on my to-do list for a long time. Finally, I found my “round-2-it”. I did have to look up which piece was the mortar and which was the pestle. It turns out that the mortar is the dish part.
I choose hard maple as a dense, non toxic wood. I eliminated others such as walnut and laburnum since they are toxic. I did not want any risk of anything bleeding out of the wood.
To finish, I did the final sanding with a 25-75 mix of beeswax and mineral oil.
Enjoy!