Woodturning – Implementing New Skills From Expert Demo
 This video is also posted to YouTube, Vimeo, and FaceBook. Best right here.
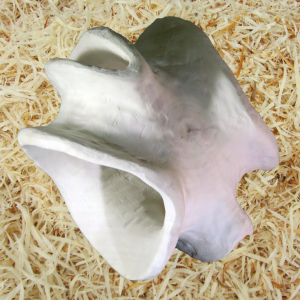
After I see a great demo by someone who truly turns something unique, I just have to try it myself. This is my situation after seeing Max Brosi at the AAW symposium demonstrate what he called a whale bone form.
The project starts with wet wood with as much diameter as possible. First, turn a sphere. Please see my videos on spheres for more details. Max used the same process up to the point of using cup centers.
One difference is that he could construct an octagon with a compass. I solved it with geometry and some math. The result is the same. From any end to a corner is the diameter times 0.293. Any side is the diameter times 0.414.
But, for this project, I don’t need a perfect sphere. So, the octagon method by itself is sufficient. Leaving the octagon mounted between centers:
- Mark lines at 30 degree intervals around the sphere and the equator line.
- Re-mount the sphere on two opposing marks. Cut a groove.
- Re-mount the sphere on equivalent marks the opposite direction. How much will determine the side and end openings. Cut a groove of equal depth and width.
- Re-mount the sphere again in the middle of the widest set of grooves. Here I did the next part a bit differently. Cut a tenon on the end around the mounting center.
- Re-mount on a chuck using the new tenon.
- Hollow as much as possible from this side
- Cut a mortise inside the new hole.
- Re-mount using the new mortise.
- Hollow the remainder from this side
- Carve the remainder.
This is a fun multi-axis project. My thanks to Max Brosi. My thanks to Max Brosi. He infected me with some great ideas.
Enjoy!
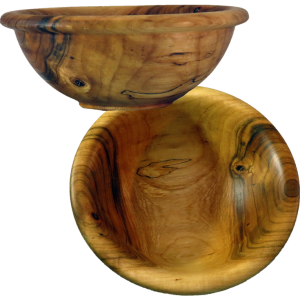
Woodturning Green Olive Into Figured Bowl
 This video is also posted to YouTube, Vimeo, and FaceBook. Best right here already!
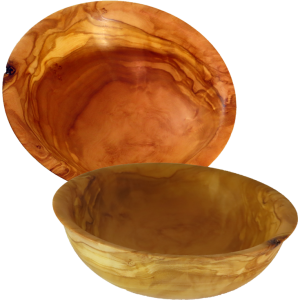
Months ago, at a club wood exchange, I received a small block of olive. I was excited because I think olive is a very petty wood to turn.
The wood felt dry, but as I started to turn it, I discovered that it was actually very wet. I like wood to be either very dry or very wet. If very dry, I hope is has not developed checks. If very wet, I hope to avoid checks and cracks.
After rough turning the bowl, I sealed the wood with Bowl Saver a glue like sealer from Craft Supplies USA. Then I let it dry but weighed it about every month. It has gone from 315 grams to 212 grams, about one-third of its weight. For me this is typical.
My finished bowl is about five inches diameter and two inches tall. It is finished with walnut oil. I will not buff this one. The matte finish is perfect.
Enjoy!
Woodturning Rustic Birdhouse From Green Apple Cores
 This video is also posted to YouTube, Vimeo, and FaceBook. Where Best? Right Here!
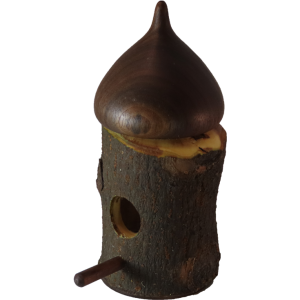
During my spring pruning, I cut off a large limb from an apple tree. At that time, I cut the limb down into sections of varying lengths and varying diameters. Leaving the natural bark, I turned tenons on each end and drilled out the centers. I placed the apple cores in a plastic bag with shavings to let them dry. After several days, I mixed up the shavings and wood again and let the plastic bag slightly open to allow moisture to escape. The wood stayed underfoot for a couple more weeks during which I “stirred” the wood and shavings. Then I moved the wood out to a shed making sure not to seal the plastic bag and left it alone for several months.
Since the wood is much thinner, the wood is dry. Since the pith has been drilled out, there are no radial checks.
- Mount the wood using the best original tenon.
- Remove the opposite tenon and drill out the wood as much as possible.
- Cut a groove inside the wood for an expansion mount. Remount the wood with an expansion mount.
- Dress the opposite end and fit a mortise and tenon joint and turn the roof section.
- Turn a disk to serve as the floor.
- Drill for entrance and perch.
- Turn a perch and glue the pieces together.
- Finish with an oil finish to brighten the bark and finish the turned sections.
My birdhouse is six inches tall and three inches in diameter finished with walnut oil. The natural bark is perfect for the main section.
Enjoy!
Woodturning Two Stave Inside Out Heart Pendent
 This video is also posted to YouTube, Vimeo, and FaceBook. Best right here already!
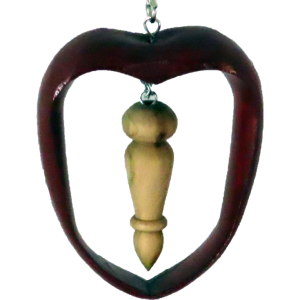
After turning a four stave vase, then a three stave art object, I was challenged to turn a two stave heart.
Wood preparation is much simpler. But undercutting the upper lobes was not. My band saw did not provide a very good option either.
Still, a two stave process may be perfect for a heart. Keep it in mind for next Valentine’s Day.
My heart is poplar about 2″ by 2″ x 0.5″ painted with acrylic paint and sealed with rattlecan lacquer. The finial is plum finished with shellac friction polish.
Enjoy!
Weird Wood Art – My First Step Into New Woodturning Realms
 This video is also posted on YouTube, Vimeo, and FaceBook. Right here is where it is best.
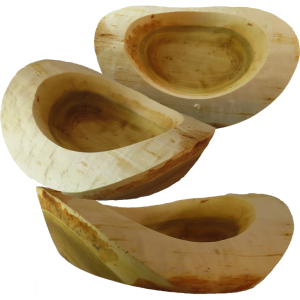
After attending the American Association of Woodturners Symposium, I’m inspired to start turning beyond round. One particular source of inspiration is Max Brosi and his multi-axis turnings.
While this turning from pear is far from one of his, it is a first step. The outside is simply coves turned in green wood. But the center is also hollowed out. No, this is not multi-axis. Multi-axis will be then next step.
This is pear wood, turned green, and finished with walnut oil. 5 by 5.
Enjoy!
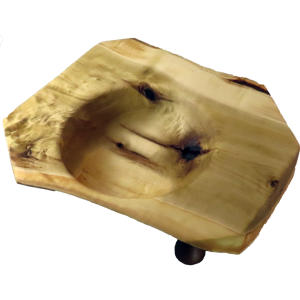
Two Natural Edge Bowls – One Up – One Down
 This video is also posted to YouTube, Vimeo, and FaceBook. But you’re already here at the best place.
At a local club wood exchange, I received two identical slabs of wood. They were quite thin and I wondered what I could do with them. They seemed too thin for a standard bowl.
The bark was ugly so i pried it off. But, underneath that bark was an interesting natural edge. The first bowl was turned with the flat side down to show off the natural edge. But I did not want to make two identical bowls. The first bowl is at this link: This Natural Edge Bowl Will Not Tip Over
So, after worrying about how to safely mount the second bowl, I decided to turn it with the flat side up but leave the natural edge intact on the bottom. The difficulty was how to mount the wood.
Finally, I drove three long screws through a wood faceplate and into the wood. I positioned the screws where I could put knobs on the bottom to stabilize the wood. Three legs self level – Four or more would have been a nightmare to not have the bowl rock. Even then, the top is not parallel with the surface the bowl can rest on. But that adds to its appeal. The second bowl is 11 by 9 by 3 inches, finished with walnut oil. The feet are walnut.
Enjoy!
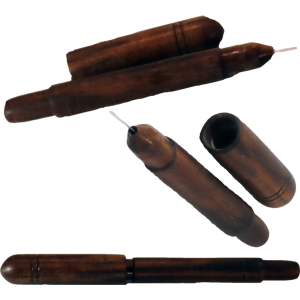
Self Storing Needle Threader For Sewing and Quilting
 This video is also posted to YouTube, Vimeo, and FaceBook. Best right here at As Wood Turns.
I remember my mother helping to thread a needle. It was the same problem whether it was thread or yard. A tiny needle hole, a big thread.
Now with more experienced eyes, it is even more challenging.
Why not make a needle threader? One that is big enough not to get lost. Yet, someone can use it to thread into those tiny needles.
My threader is walnut finished with CA, mineral oil and beeswax.
Enjoy!
Surprisingly Pretty Small Bowl From Pear
 This video is also posted to
 This Natural Edge Bowl Will Not Tip Over
 This video is also posted on YouTube, Vimeo, and FaceBook. Where Best? Right Here Already!
From a club wood exchange I have this piece of wood that I believe is poplar. It seems to be the left over slab from where a bowl blank was cut out. There is a lot of bark but not much wood.
It is a challenge that I decided to respond to.
What would you have done?
Enjoy!
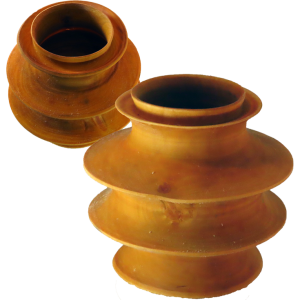
Deep Hollowed Aspen Vase – Easy With Right Tools
 This video is also posted on YouTube, Vimeo, and FaceBook. Best right here!
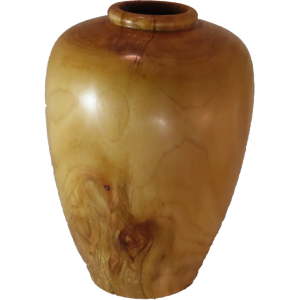
At a wood exchange I inherited a limb of aspen, not in great shape but worth turning and trying out my new deep hollowing system.
The vase is 7 inches tall and 5 inches in diameter finished with walnut oil and a thorough buffing.
The deep hollowing tool was provided by the Southern Woodturners to their members. Sorry, they are not selling them outside their club. However, they did a great job at a low cost.
They are about to change over from a laser mount to a camera. I had a USB inspection camera (source: Amazon – a long time ago) that I mounted to the laser mount and plugged into an old laptop. The built in Windows camera application then shows the position of the cutting tool. Before operation, I taped plastic to the computer screen and traced the outline of the cutter. Since the camera moves with the tool movement, I can see on the screen just where the cutter is that is inside the wood.
If you’ve used a laser for this purpose, try this out. You’ll never go back.
Sorry about the video of the computer screen. But, you’ll get the idea.
Enjoy!