This Pruned Limb Did Not Go to The Dump
 This video is also posted to YouTube, Vimeo, and FaceBook. Where best – Right Here of course!
While I was doing some fall pruning, I cut a small to medium limb off of a crab apple tree. As I prepared the wood to go into the garbage bin, the limb presented itself. Exactly how, I do not know.
But I realized although this was only a limb, perhaps I could turn some smaller projects from it. One crotch caught my eye since the wider area could yield a larger bowl than otherwise.
So I took the limb into the shop and turned this small bowl only about three inches in diameter.
Remember, the Christmas Ornament Challenge. Please get your ornament ready for this year’s challenge. It does not have to be fancy or perfect – this bell is neither fancy or perfect. However, it is a nice addition to the Christmas Ornament Challenge.
To enter the challenge, please go to the Challenges page.
Enjoy!
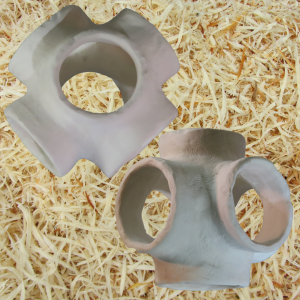
Multi Axis Woodturning – Ribbed and Holey
 This video is also posted to YouTube, and Vimeo. Best Right Here!
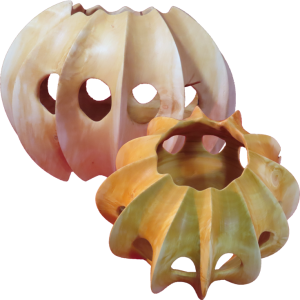
This project is my third where I am emulating Max Brosi after seeing his demonstrations at the the AAW symposium last summer in Raleigh, North Carolina. The other projects were his octahedron and his whale bone. Each of the three projects starts with a sphere, something that I’ve demonstrated many times. It was interesting to hear someone else explain it a little differently.
After turning a sphere, I had to mark for and cut 12 coves around the sphere. After the coves are cut, then I hollowed the sphere through the ends and allowed the hollowing to break through the lower middle section of the coves. Then clean up with carving tools.
Other than turning an interesting project, I appreciate the many great ideas that flowed from completing these turnings.
This is ornamental pear, very wet when I started. It is now finished with walnut oil.
Remember, the Christmas Ornament Challenge. Please get your ornament ready for this year’s challenge. It does not have to be fancy or perfect – this bell is neither fancy or perfect. However, it is a nice addition to the Christmas Ornament Challenge.
To enter the challenge, please go to http://www.AsWoodTurns.com/Challenges
Enjoy!
Woodturning Mesquite Bowl – Back To Basics
 This video is also posted on YouTube, Vimeo, and FaceBook. But, you are already here.
Oh how I love to green turn a wood bowl. This is what attracted me to woodturning in the first place – I wanted to turn wood bowls. Other turning projects are great and interesting but I still love turning bowls.
This wood is green or wet mesquite. Since I wanted this to be perfectly round, without any warp, I used a two step process.
First, rough turn the bowl.
- Mount the blank. Options include between centers, screw chuck, and pressing against a faceplate. I rarely screw a faceplate to the wood anymore.
- Get the wood round. This is the hardest turning since the blank is unbalanced. I don’t try to precisely cut a blank round because it limits where I can place the centers and I risk cutting away wood with a band saw that I would want later with the bowl.
- Form the exterior in whatever shape I see inside the wood. Critical features here are a mounting tenon; a clearly marked center usually from the live center but cut in if necessary; and a secondary ledge that visually helps me form the curve of the bowl excluding the tenon.
- Reverse the bowl onto the tenon and hollow ther interior leaving the walls uniform but about 1″ thick for this size bowl. (about an inch per 10 inches of diameter)
- Dry the bowl. I like to seal the bowl but this is optional. I’ve also used shavings, a paper bag amoung other techniques to moderate the speed of drying. I want the wood to dry uniformly through its thickness. If the surface wood dries too quickly, a crack is guaranteed. Still cracks are a risk.
Second, refine the bowl.
- Press the bowl against a faceplate sized to its exterior diameter or at least to its interior diameter. Either works. Refine the tenon and the exterior bottom.
- Mount the bowl into its refined tenon. Refine the exterior and again hollow the interior to its final shape.
- Refine the foot. There are many options to refine the foot: carving, jam chucks, or in this case using Cole jaws on a chuck to hold the bowl while the foot is refined.
- Sand. I always start sanding a medium to large with no greater than 80 grit. Then progress up through the grits. The first grit removes any final ridges, grooves, and other defects(if possible). Subsequent grits only remove scratches from the previous grit. It is false economy to start sanding with too fine grit sandpaper.
- Finish
The Christmas Ornament Challenge will open November 1. Please get your ornament ready for this year’s challenge. It does not have to be fancy or perfect – this bell is neither fancy or perfect. However, it is a nice addition to the Christmas Ornament Challenge.
To enter the challenge, please go to http://www.AsWoodTurns.com/Challenges
Enjoy!
Woodturning Experimental Segmented Christmas Ornament
 This video is also posted on YouTube, Vimeo and FaceBook. Where Best? – Right Here!
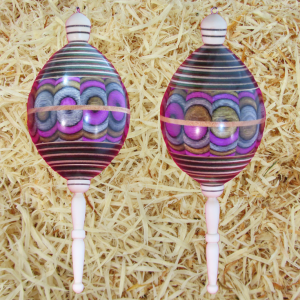
This is the first time I’m using type of wood. It comes from FrogBlanks.com. It consists of birch veneers that may be dyed, then laminated in one directly only. (It is NOT cross banded). This is pretty wood.
However, I generally do not use plywood for turning projects. This, is different, because there are no voids and no cross banding. Therefore, the wood is uniform. Cross banding is not necessary due to the quality of veneer incorporated.
But, even colored wood could be fairly plain and not the look that I wanted. However, if the blank is cut and turned 90 degrees, it could yield a very pretty pattern.
Other woods used are hazelnut for the finials, maple veneer for accents, and honey locust for the center dividing band.
Please get your ornament ready for this year’s challenge. It does not have to be fancy or perfect. However, I will add it to the Christmas Ornament Challenge.
To enter the challenge, please go to http://www.AsWoodTurns.com/Challenges
Enjoy!
Woodturning Mixed Laminated Christmas Bell Ornament
 This video is also posted on YouTube, Vimeo, and FaceBook. Where Best? Right Here Already!
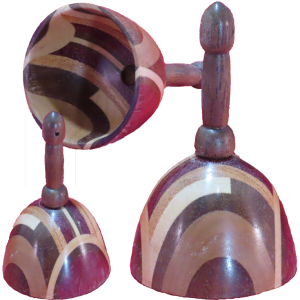
This is my first ornament for this year’s Christmas Ornament Challenge. It is a variety of woods from a past laminated project. One nice thing about Christmas ornaments is that scrap wood is a great source of perfect material.
This project turned out to be a bell. But, it did not start out that way. At a critical point in the process the project concept took a sudden turn and it because a Christmas bell.
Please get your ornament ready for this year’s challenge. It does not have to be fancy or perfect – this bell is neither fancy or perfect. However, it is a nice addition to the Christmas Ornament Challenge.
To enter the challenge, please go to the Challenges page.
Enjoy!
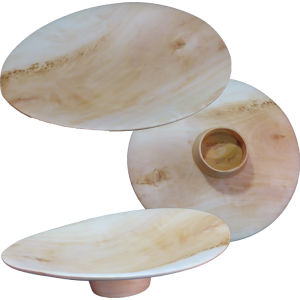
Woodturning Wave Bowl With Hollow Pedestal
 This video is also posted to YouTube, Vimeo, and FaceBook. Where Best? Right Here!
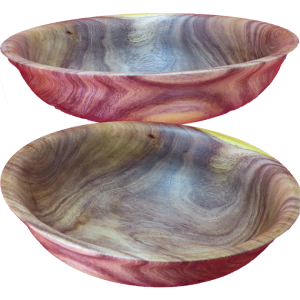
When turning wet wood for a wavy shallow bowl, I’ve been concerned for the pedestal part of the bowl. This large, thick piece of wood could be prone to checking and cracking as it dries.
So, for this bowl, I decided to try to hollow the pedestal. This requires one additional sacrificial tenon and another careful remount. Despite a couple of mis-calculations, it worked in the end. While the pedestal did warp with the rest of the bowl, it did not crack.
Enjoy!
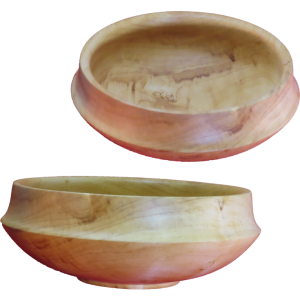
Woodturning Basic Bowl – Never As Simple As It Should Be
 This Video is also posted to YouTube, Vimeo, and FaceBook. Right here at As Wood Turns is where it is best!
This piece of wood came from the club wood exchange. Someone had started to turn it wet but stopped and gave it away. Now it has set around for long enough that it is dry. Fortunately, it did not crack in the drying process. Lucky break.
I kept the original outside shape but that precluded some remounting options for turning the foot. Since the original divot was not true, I chose to carve the foot with a right angle tool with a rasp cutter. That worked better than I expected.
As for the original woodturner- his loss is my gain. It is a pretty bowl.
Resources
- Carving Tools
- Variable Speed Angle Grinder
Proxxon Longneck 2″ Variable Speed Angle Grinder
I don’t see this model around much any more.
- Variable Speed Angle Grinder
Enjoy!
Multi-Axis Woodturning Octahedron
 This video is also posted on YouTube, Vimeo, and FaceBook. But, you’re already here!
As I’ve noted before, I was impressed by demonstrations by Max Brosi at the AAW Symposium at Raleigh, NC this summer.
At first, I could not figure out how to turn this octahedron. However, once I understood the process that Max follows, then I have no fear any longer. Further, I can adapt the process to use some already familiar techniques.
Basically, this is an exercise in mounting wood. This project used both drive centers and a chuck with multiple mounts. Beyond that, you’ll need to watch the process.
Resources
- DIY Wood Bleach For A Lighter Hue https://www.aswoodturns.com//2019/09/wood-bleach/
- Carving Tools
- -Variable Speed Angle Grinder
Proxxon Longneck 2″ Variable Speed Angle Grinder
I don’t see this model around much any more. - -Micro Motor Carver
Ram iCube 07-ICUBE
I purchased this at AAW symposium from MDI Woodcarvers Supply
- -Variable Speed Angle Grinder
Enjoy!
DIY Wood Bleach For A Lighter Hue
 This video is also posted to YouTube, Vimeo, and FaceBook. Best right here!
After seeing several examples of turning projects that had been bleached, I decided to try bleaching wood myself. I researched on the internet and found some great resources especially from AAW.
I also checked for commercial wood bleach products. Most of these turned out to be wood cleaners based on oxalic acid.
The solution I settled on is a two part solution. One part is a lye (sodium hydroxide) solution. The second part is hydrogen peroxide, a pool sanitizer. The tricky part was finding sources for both chemicals. For the lye, Amazon has pure lye crystals in their soap making section. For the hydrogen peroxide, a 27% solution is sold at swimming pool suppliers. Drug store hydrogen peroxide may say 27% but is actually more dilute.
Preparation
The 1.5 teaspoons lye crystals are added to 1/2 cup water and stored in a well marked plastic container with a good plastic lid. Safety Note: Always add the crystals to water not vice versa. The vice versa is likely to spatter lye.
The 27% hydrogen peroxide is used as is.
Since both of these chemicals are potentially dangerous, pay attention to personal and property protection. Working outdoors with gloves, goggles, and protected surfaces is recommended.
Application
Mix equal parts of the lye solution and hydrogen peroxide in a plastic or glass container and apply to the wood to be bleached with either a cheap brush or dipping. Allow to dry. The solution will likely bubble.
For these items, I applied the mixed solution four times. Results vary with the wood species, wood preparation, and grain orientation.
When bleached, I applied household cleaning vinegar(acid) to neutralize the lye, a base. From the research, this step is optional.
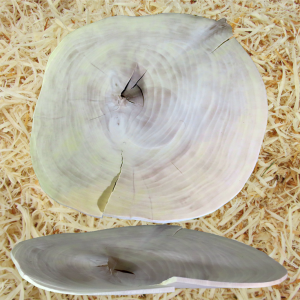
My thin cross-grain disks from pear wood warped and cracked when the solution was applied.
Enjoy!
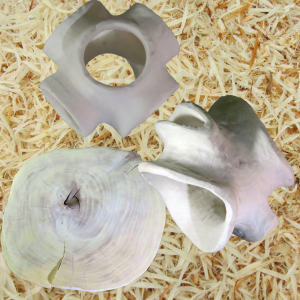
Woodturning – Wild, Warping, Cross Grain Disks
 This video is also posted on YouTube, Vimeo, and FaceBook. Best right here at As Wood Turns.
After seeing Pascal Oudet from France at the AAW symposium demonstrate, I came home to try it myself. I hoped to replicate the look and feel of his project. Pascal also sand blasts and bleaches many of his projects.
However, I used fresh wet ornamental pear while he used French oak. The choice of wood, I think makes a difference for this project. Oak has more pronounced grain with hard and soft rings. Oak is also a tough wood that holds together well. On the other hand, the pear was more uniform and probably not as tough.
Next time, I try this, I’ll use oak or another wood with definite hard and soft rings.
Essentially, I mounted the wood while I cut a mounting tenon. Then cleaned up the live center side. Then gradually cut back on wood next to the headstock until I had a disk about 1/8 inch thick. Wet wood is flexible and already warping by the time I turned down to the center. I bleached my disks but did not see that sand blasting would have the same effect as on oak.
It was a wild experience. On my third try, I completed a disk that was intact. However, as it dried, it warped as expected and cracked not as expected. While bleaching the wood, it cracked even more.
Enjoy!