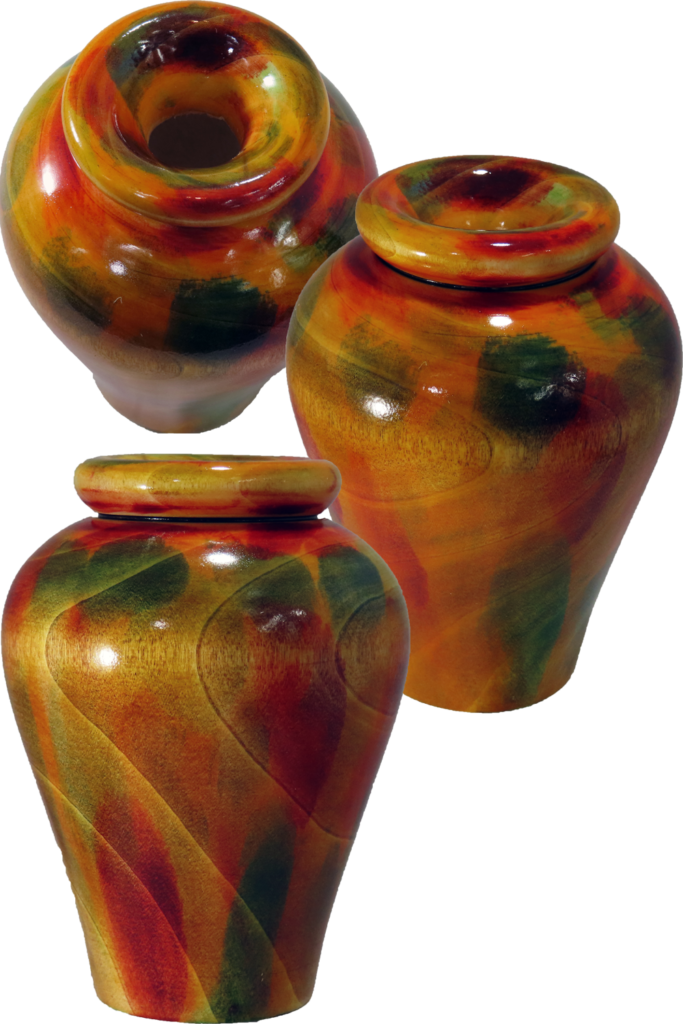
Woodturning Dyed Vase – Wet to Dry
For convenience, this video is also posted on YouTube, Vimeo, and FaceBook. More better right here.
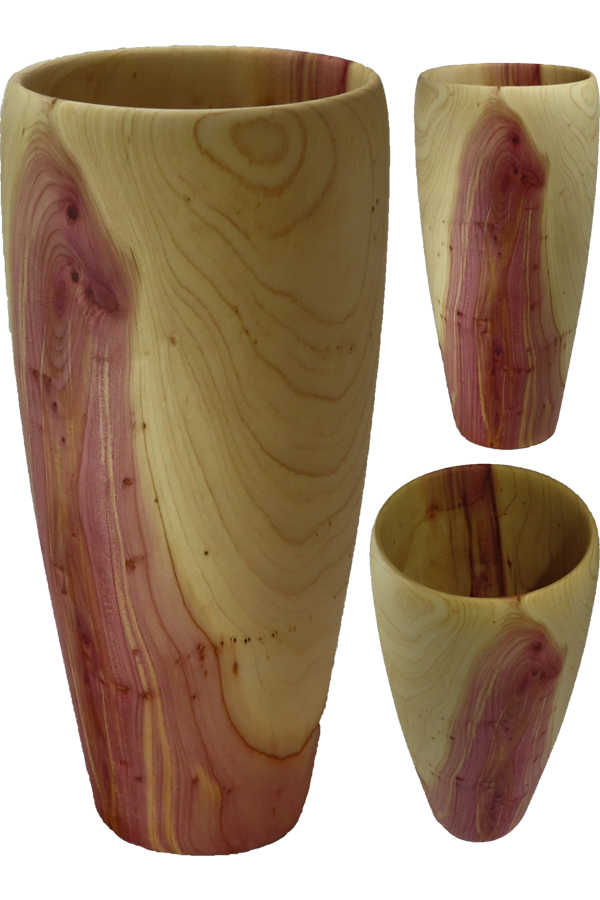
The wood for this project is green or wet aspen that I received in a club wood exchange (pre-Covid). I turned it green, and put it away to dry. Now I can remount, finish hollowing, and finish the vase.
However, aspen is (to me) a plain wood without a lot of character.
To compensate, I decided to apply alcohol based dye. Since I could not decide which color would be best, I used all that I have – even black (it is on the bottom).
I think it turned out nice. I would apply color this way again.
I also used my DIY steady rest for insurance against unidentified flying objects in my shop.
Enjoy!
Links
My DIY Lathe Steady Rest
Update To My DIY Lathe Steady Rest
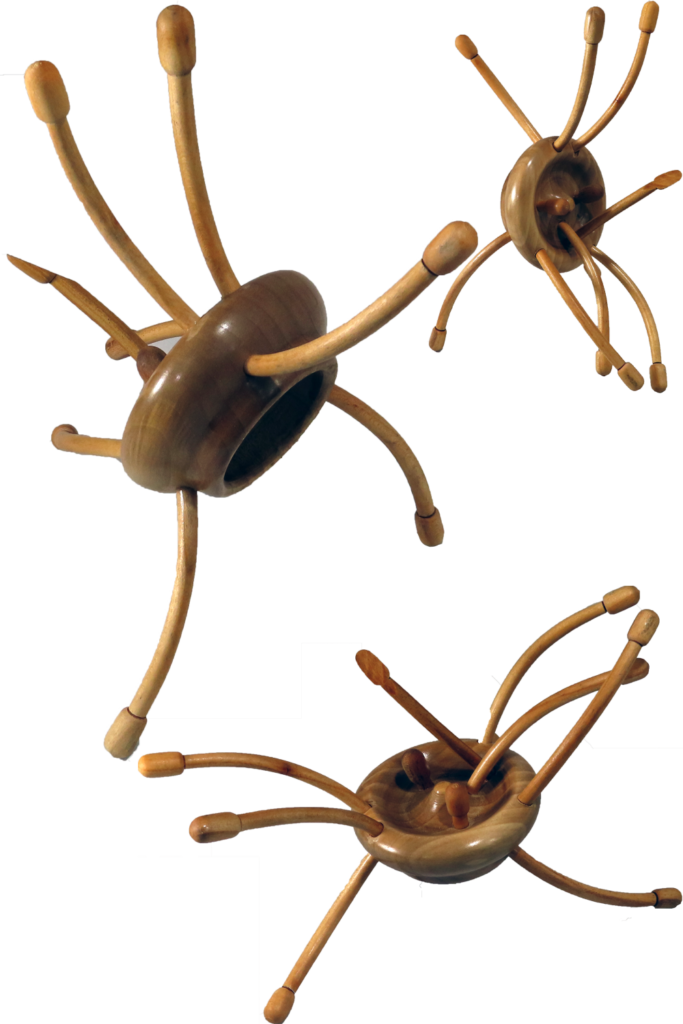
Woodturning With Negative Space – Whoops What Happened?
FYI, This post is also on YouTube, Vimeo, and FaceBook, Best right here!
I started this project to explore a bowl form with negative space. My plan was to turn twelve long thin spindles and form them into a bowl shape.
Turning twelve similar spindles is a challenge so I kept the profile very simple. In addition, variation in spindle thickness would bend very differently. I used air dried cherry that I split so the cuts would follow the grain.
Bending was a challenge. I divided the spindles into two batches of six. Then steamed each batch for 20 minutes in a pressure cooker. After a full cycle, I bent the spindles around a plywood form and clamped them to dry. However, even with splitting the wood, many did not survive the bending. Many split as they bent. Perhaps the curve was too great.
I turned more out of another half log of cherry. These I rough cut on the band saw trying my best to follow the grain. Most of these also broke or split when turning or bending. Many broke instead of splitting, indicating low strength in the wood.
I needed still more to replace those that broke. I grabbed a kiln dried board of cherry and turned two more. The grain was very straight and turned nicely. However, when steamed, the first immediately split. The other did not want to bend. I steamed the other again immersed in water. This one finally bent easily but still split.
Disaster had struck. Plan “B” was long gone.
Enjoy!
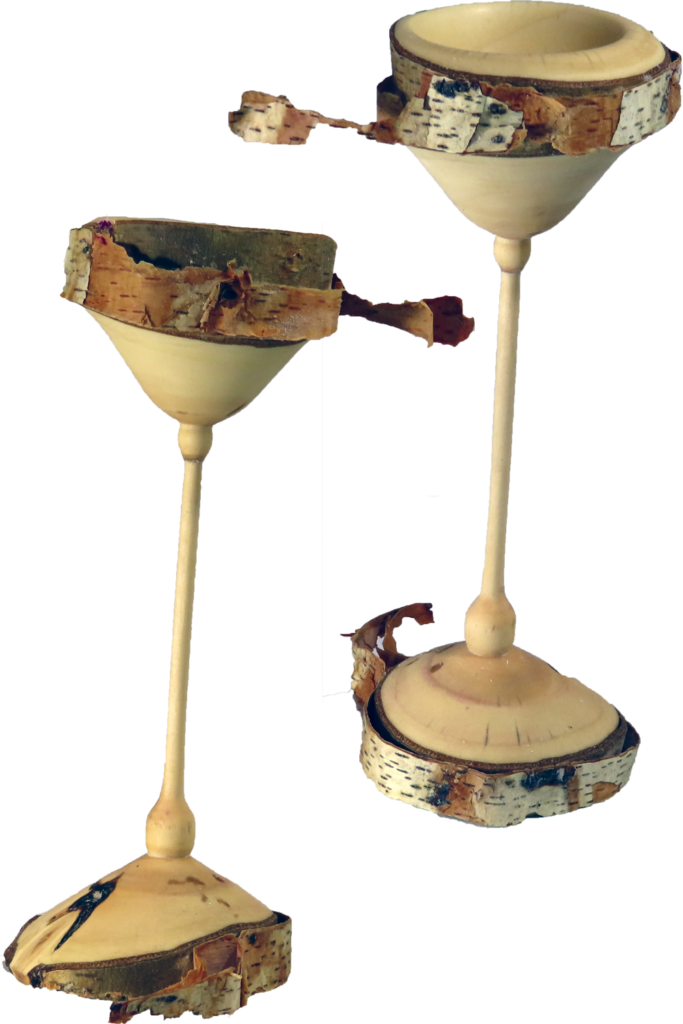
Woodturning Thin Stem Goblet With ‘Shaggy Dog’ Bark
You are here which is great. In case of difficulty, this video is also posted on YouTube, Vimeo, and FaceBook.
The wood for this goblet is unusual. It is birch with a very shaggy bark. It did not leaf out this spring. So, now it is wood for turning.
Turning a thin stem on this goblet does require some special provisions including support for the long thin piece.
My process sequence is:
- Mount between centers making sure the pith is off center.
- Cut a mounting tenon and remount in a chuck.
- Cut a smooth area in the stem area for use with the steady rest.
- Engage the steady rest.
- Hollow the interior of the goblet and sand. Optionally apply finish.
- Support the bowl portion with a fitted faceplate on the live center. Remove the steady rest.
- Cut the exterior of the bowl portion.
- Working in small sections, form the stem portion, never going back up to previous thin sections.
- Form the exterior of the base.
- Either on the lathe or with carving tools, hollow the interior of the base if the wood is wet.
The goblet is 6 inches tall and 2 inches in diameter and finished with walnut oil.
I now can do remote demonstrations for any club, world-side.
Links:
My DIY Lathe Steady Rest (Be sure to also watch the next one)
Update To My DIY Lathe Steady Rest
Enjoy!
Woodturning Pear Bowl – Wet To Dry To Finished
This Video is also posted on YouTube, Vimeo, and FaceBook. Please stay right here. This is it.
The wood for this bowl came from a neighbor’s ornamental pear tree that came down in a microburst. The wet wood was heavy and dense – wonderful. I have made several projects from this tree.
Shortly after harvesting the tree, I rough turned the bowl. The wood was very irregular – prompting an extra mount to resolve the uneven bottom surface.
After coating the bowl with green wood sealer, I let it dry about 11 months, periodically weighing the bowl and recording the date and weight. When the rate of change in minimal, it is dry enough.
I was concerned about a branch running vertically in the side of the bowl. This could be the source of uneven drying, cracking, and extreme warping. As it turned out, it only distorted the side of the bowl but was the source of tear out that I had to sand.
The bowl is 9 inches in diameter and finished with walnut oil.
I now can do remote demonstrations for any club, world-side.
Enjoy!
Woodturned Plate – Chop To Dry To Finished
This video is also posted on YouTube, Vimeo, and FaceBook. I’m glad you are here at As Wood Turns.
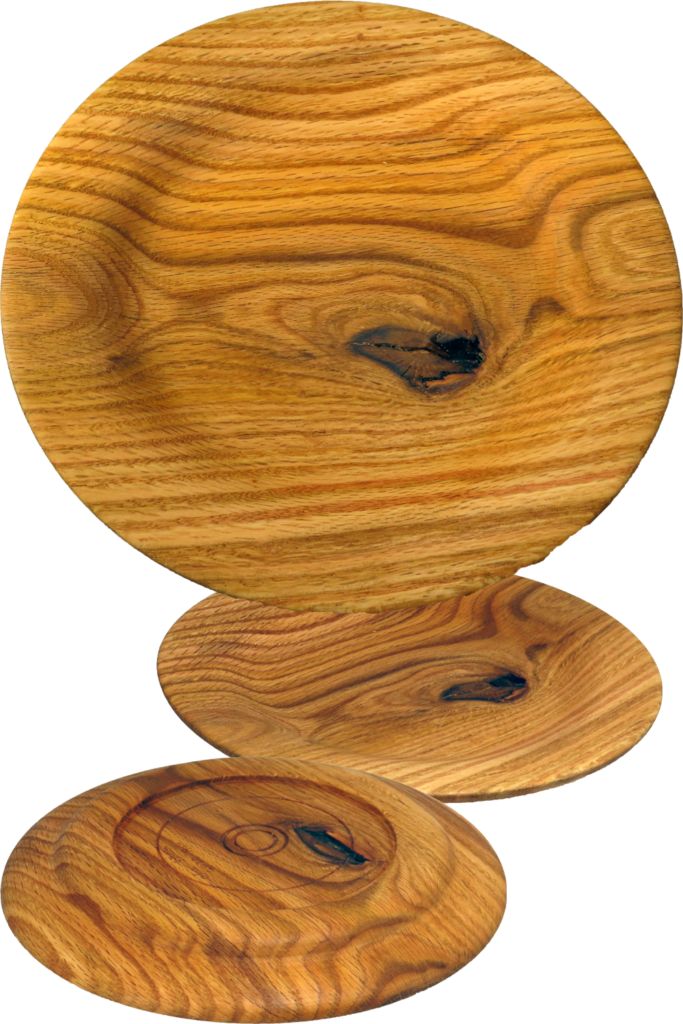
The ash wood for this plate came from a friend’s tree over a decade ago. At that time, I was cutting for bowls but had a couple of slabs left over that were near the pith. I sealed the wood with wood sealer and left it to dry.
I got busy and did not get back to the wood for a long time. In the meantime, the wood dried, warped, and developed a crack. The crack bothered me since I had left some of the pith in the slab. That is where the crack was.
There was additional delay as I debated whether to use a screw center or a pin face plate. A screw center requires a pilot hole to a precise depth. Since a plate is shallow, this was a risk. The kink from the wood warping would also not let the wood seat well on the screw center.
On the other hand, a pin faceplate must have the wood held by the live center. I like to finish the bottom side early in the turning process but the live center would have been in the way.
I compromised by cutting a sacrificial tenon and flipping the wood over one additional time. The sacrificial tenon would be on the top side of the bowl.
The plate is 9 inches in diameter and finished with walnut oil. A loose knot decorates the center.
Related Video Link.
Pin Face Plate and Threaded Wood Face Plates For Woodturning
I now can do remote demonstrations for any club, world-side.
Enjoy!
Woodturned Vase – Wet To Dry To Finished
For convenience, this video is also posted on YouTube, Vimeo, and FaceBook. Best Right Here!
At one of our last club meetings, we had a wood exchange during which I received a chunk of fetzer wood. Fetzer is an unusal wood for turning and to my knowledge rarely grows this large.
The wood was freshly cut. I would expect it to split and crack as it dries. However, I decided to risk rough turning a vase, let it dry in a rough state, and turn it to final shape when dry. I did not know whether it would survive drying intact.
But, it did.
The vase is finished with a mix of 1 part polyurethane; 2 parts boiled linseed oil, and 3 parts mineral spirits. It is 4 inched diameter and 8 inches tall.
Related Video Link.
Update To My DIY Lathe Steady Rest
I now can do remote demonstrations for any club, world-side.
Enjoy!
Woodturning Short Break – Simple Bark Edge Mushrooms
While this video is best viewed right here at As Wood Turns, it is also posted on YouTube, Vimeo, and Facebook
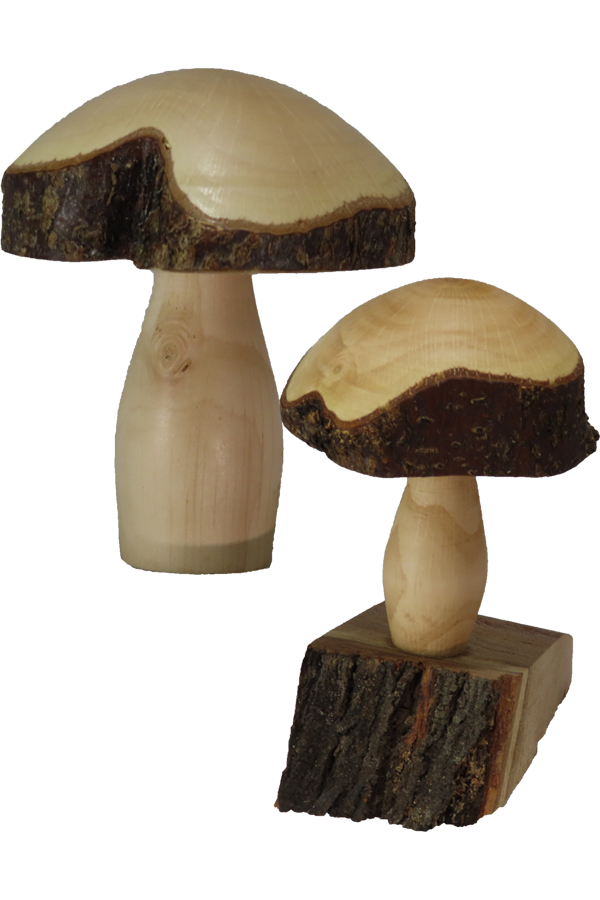
Our local club is holding remote demonstrations during this Covid-19 pandemic. Our last member demonstrator, Lauren Gibbs, showed off two versions of mushrooms as part of his series of quick projects.
Plus, the president’s challenge for next month, that we will show each other via video before next month’s remote demonstration will be mushrooms.
An indoor mushroom should be able to stand on its own.
An outdoor mushroom may be held up by extra length on its stem pushed into the ground.
My mushrooms are 3 by 4 and 3 by 5 of dry hazelnut. The smaller indoor mushroom is finished with shellac. the outdoor mushroom with the extra stem length is finished with walnut oil.
I now can do remote demonstrations for any club, world-side.
Here are more mushroom videos from several years ago. (Click title for the link)
- Woodturning A Mushroom in Apricot
- Woodturning A Field of Mushrooms (Part 1)
- Woodturning A Field of Mushrooms (Part 2)
- Woodturning A Field of Mushrooms (Part 3)
- Woodturning A Field of Mushrooms (Part 4 & Final)
- Woodturn Natural Edge Fig Mushroom – Not For Soup
Enjoy!
Six Handicap Woodturning – Segment Ring Thread Chasing
This video is also available on YouTube, Vimeo, and FaceBook. Please stay right here at As Wood Turns.

After receiving comments about deficiencies in power tools preventing viewers from trying to thread segmented thread sets, I decided to handicap myself and try to repeat Frank’s success.
Handicaps:
- Table saw with no jig
An 8 segment ring requires angles at 22.5 degrees. With my saw’s miter gauge, I could only approximate 22.5 degrees. - Band saw with no jig
I generally do not use a band saw as my saw leaves a very rough cut on the surface. - Sander with no jig
Some people have jigs with precise angles for sanding perfect rings. - Gluing with no jig
I used a rub technique from a pattern maker. Simply spread glue, rub to squeeze out excess glue. Shortly the glue will seize. - Hand chasing threads lacking muscle memory aka I don’t have Frank’s threading experience.
- No RPM meter on my lathe. A meter does not measure how fast the surface of the wood is moving.
I made this thread set from cherry.
I need more practice to come close to Frank’s level from last week’s video
Enjoy!
Threading Wood For Every Day Woodturning

This video is also posted on YouTube, Vimeo, and Facebook. Best right here!
We have a special guest for this week’s video. Frank Young is a master woodturner. He will show hand chasing threads in segmented wood for all sorts of projects.
Why threads in segmented wood?
Usually when someone is chasing threads, they must use very hard, close-grained wood. Typically, these are exotic tropical hardwoods and very expensive. Some, like boxwood, have become scarce and only available in small dimensions.
What makes these hardwoods well suited for chased threads? Their wood is dense and strong to hold threads threaded on end grain.
But, what if we can expand threading to more common and less expensive domestic woods? The problem is that threads in these woods are not strong and quickly break away.
The solution is to only use the side grain in these woods. With side grain threads, the grain structure better supports the threads making them less brittle and well suited to supporting the threads.
How to use only side grain? Simple. Cut the wood into trapezoidal segments and glue them together like segmented vessels. Voila, side grain.
Not only side grain, but side grain of any diameter, any height.
What if my project is of solid wood? Easy, make the threads separately then glue the threaded segments into the near finished project – an insert.
The final advantage. Threading can be separate from the main project. If the threads get messed up, the project is not ruined. Simply remake the threads and continue.
There’s more but start and explore the possibilities. Plus, domestic woods are more sustainable than tropical rain forest woods.
Frank Young is my guest turner.
Enjoy!
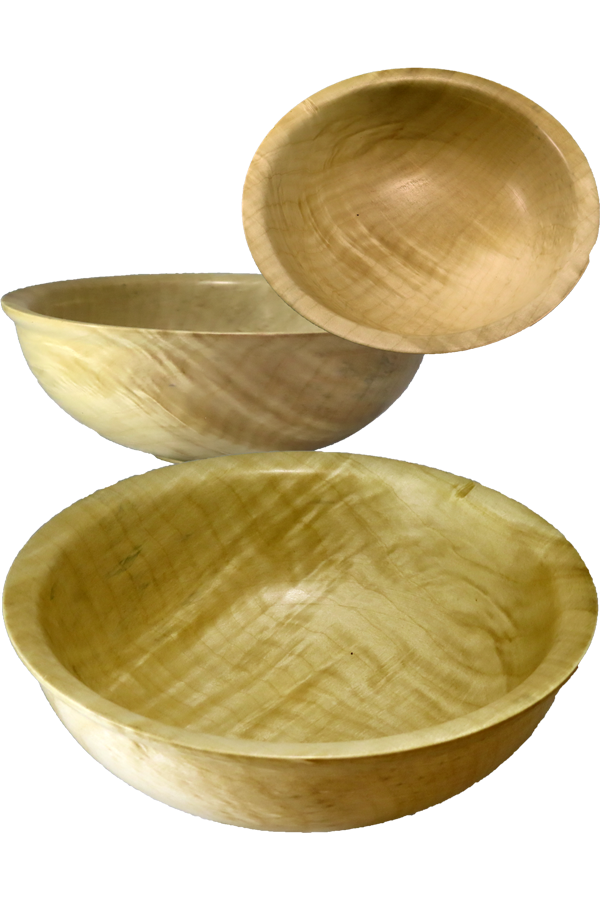
Woodturning Wet Wood – Figured Box Elder Bowl
The video is also posted on YouTube, Vimeo, and FaceBook. Best Right Here!
Woodturning a bowl is always a pleasure for me. I am excited to see what can emerge from a block of wood.
When I started woodturning, my wood had to be dry. What else was there? As I learned about drying, cracking, and warping, I also learned about turning green or wet wood.
I’ve tried many different ways to accelerated wood drying. Some require expensive chemicals, extensive processing, or a prolonged heat source. I’ve decided to be patient and use a twice turned technique for bowls that are to be perfectly round – no warping allowed. (All at once is a different exercise – with a different result.)
This box elder was turned to a wall thickness of 3/4 to 1 inch. Then coated with a green wood sealer and left to dry. After months of periodically weighing the bowl and recording its weight, the lack of weight loss indicated that it is dry and can be finished turned.
This is finished with walnut oil and buffed for a moderate shine. It is about 8 inches by 3 inches.
I’ll always come back to turning a bowl.
Enjoy!