Woodturning Golden Chain Bowl – A Long Time Coming
This post is best viewed in the space above here. In case of difficulty, it is also posted on YouTube and FaceBook.
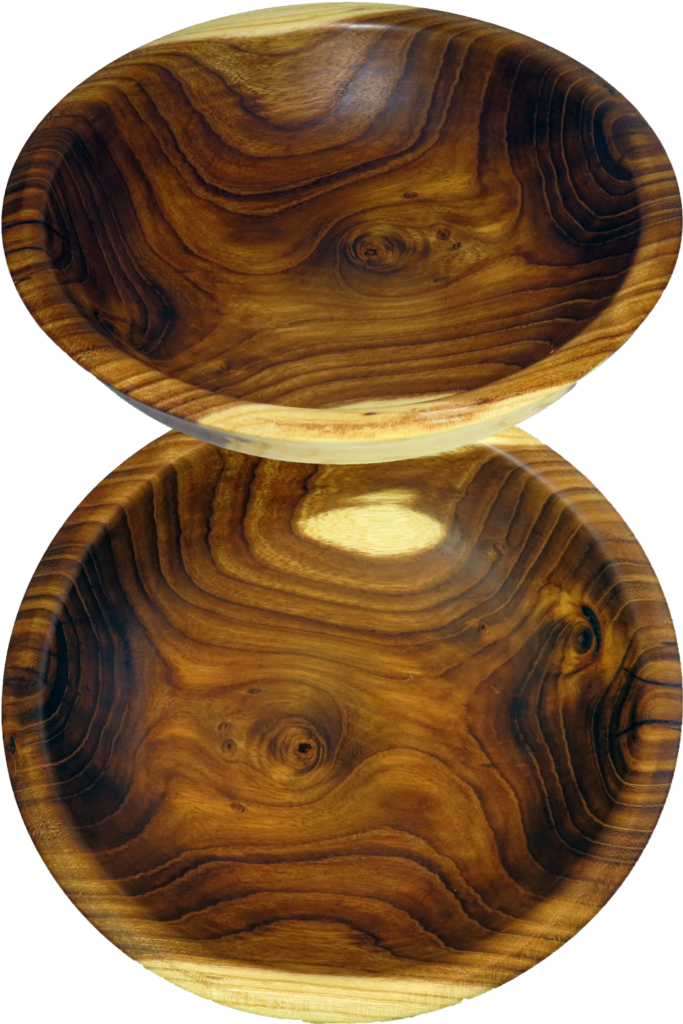
I was not familiar with this wood, Golden Chain, when my Oregon neighbor cut it down. I thought it would be a usual turning experience.
I tried to core some of the wood as I needed practice. I got beat up. That is when I did my research. Golden Chain is native to Europe where it is known as Laburnum. It is toxic in any form to animals. Most importantly, it is very hard and dense and often a substitute for ebony.
Rough turning the wood green into a bowl was not too hard. Wet wood is always a pleasure to turn. I sealed the wood and put it away to dry.
Meanwhile, I moved to Utah and got distracted for about nine years. The wood is definitely dry now. I have to bite the bullet sometime and finish turning it. Yes, very hard and dense. I am happy I did not have to turn the entire bowl while dry.
Laburnum has a beautiful mellow brown color. Sapwood adds a great contrast. It is 8″ diameter; 2″ tall finished with walnut oil and buffed.
Enjoy!
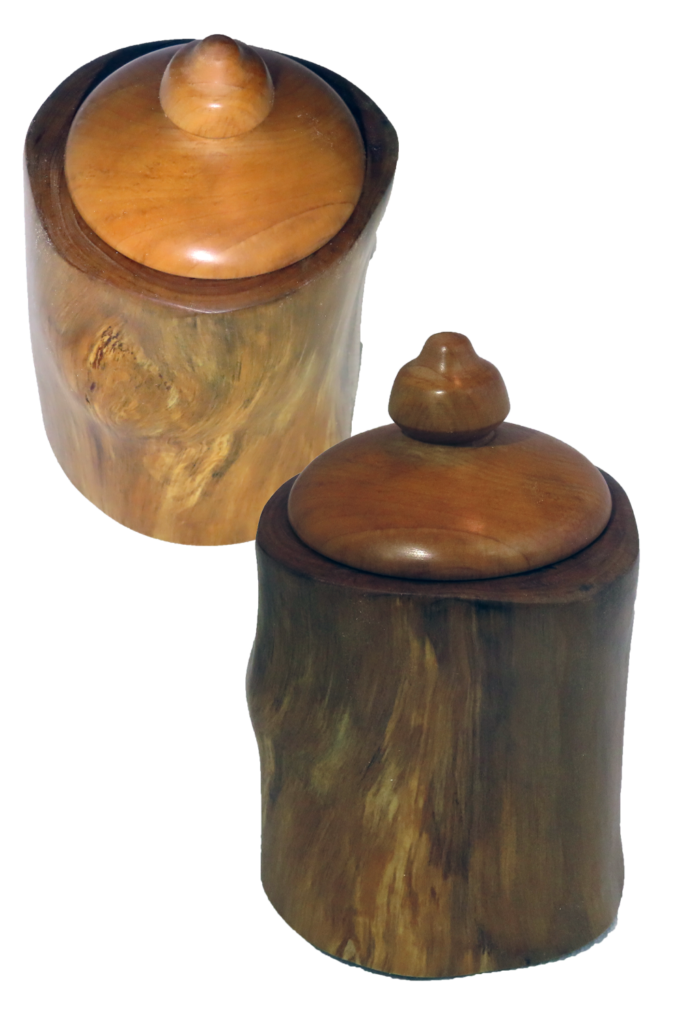
Woodturning Elm Burl Vase That Almost Was Not
This post is best viewed in the control above. However, in case of difficulty, it is also posted on YouTube and FaceBook
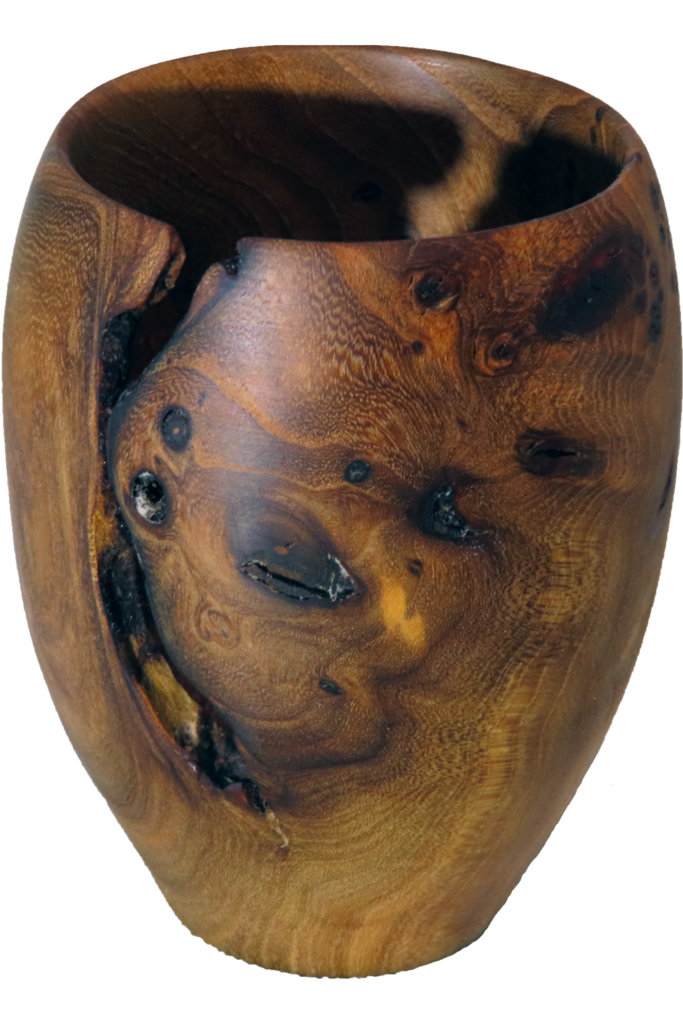
I almost threw this wood out – three times. As wet wood, it was a small left over piece. As rough turned, it looked like it would come apart. In finishing, I feared it would fly apart.
The wood is elm burl, that came from a tree a couple of miles from me. They had cut it into short slices. Not very good for bowls. The finished vase is about 4 inches tall and 3 inches diameter with walnut oil finish.
I used my recently revised doughnut chuck to finish the bottom. This version uses a large base on a threaded wood faceplate with t-nuts at 120 degree intervals. A center hole enables custom center profiles. A hefty ring matches the bolt holes but with enough recess that the bolt heads are below the surface, protecting my hands from accidental contact. An inner mortise holds custom rings for different size projects. It is simple to make.
Enjoy!
Secure Cross Grain Box – 3D Print Meets Woodturning
This post is best viewed above here. In case of difficulty, it is also posted on YouTube and FaceBook.
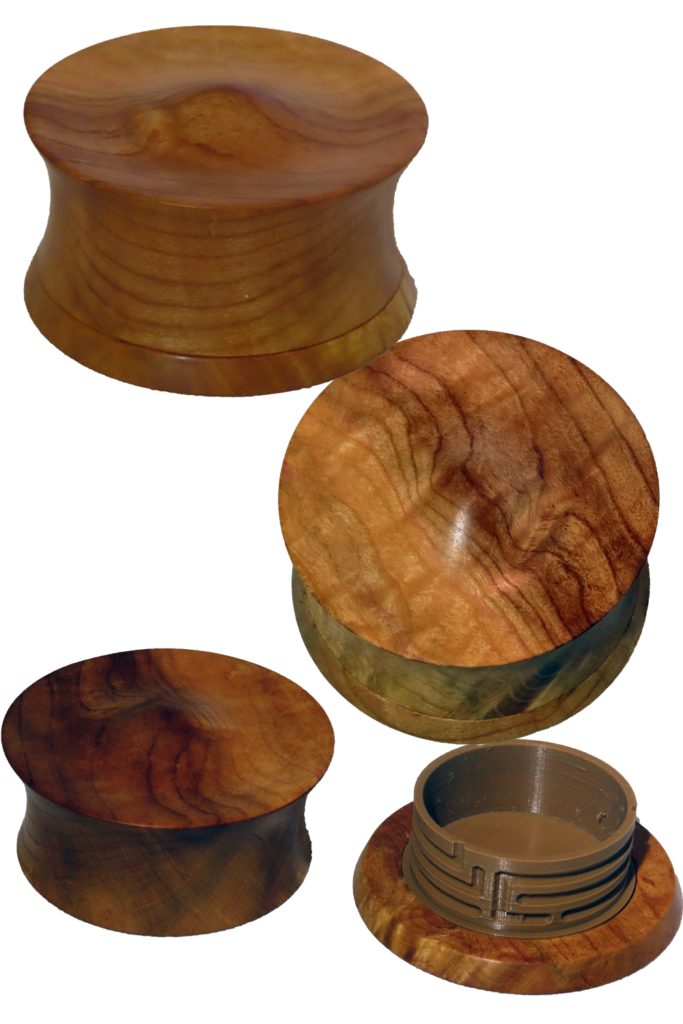
The wood for this project is plum burl salvaged by a wood carver. Unfortunately, he lost his job due to Covid and had to move. The wood could not go with him.
This box has a 3D printed insert. This insert, printed on my Prusa mk3i printer, I have designed to be a simple twist, lift, and back twist pattern. My wife does not want to spend an hour opening her box. It is complex enough to foil a casual thief – but not complex enough for a dedicated thief.
Plus, the plumb wood is pretty.
The box is 3 inches diameter a little over 1.5 inches tall and finished with shellac friction polish.
Enjoy!
Five Options For Woodturning Lathe Faceplates
This is best viewed with the control immediately above this. However, in case of difficulty, it is also posted on YouTube and FaceBook.
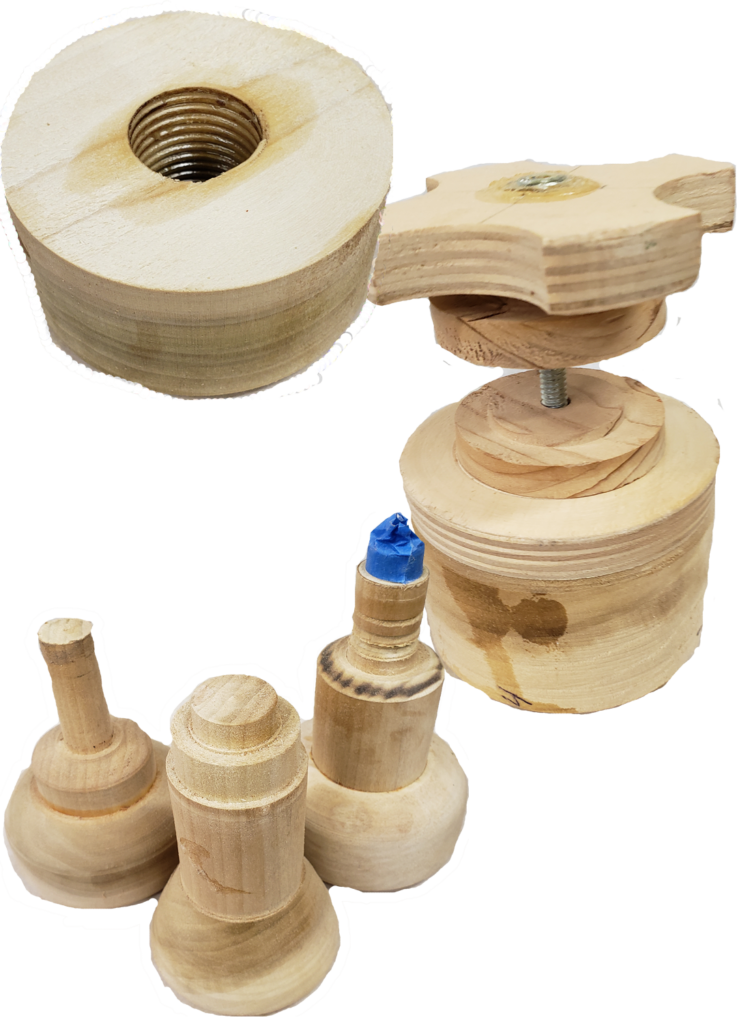
I use a lot of faceplates in many different configurations. I prefer to start with an inexpensive block of poplar, thread it, and then adapt it to my project. When finished, I may face off the base block and put it away until another is needed. I have a box dedicated to my cache of faceplates.
Steel faceplates are too expensive to have a lot of. To add insult to injury, attaching wood requires screws which can ruin my turning tools if hit.
Beyond all steel faceplates, there are two options: a steel nut embedded in wood; direct threading in wood.
For a larger 1 1/4″ x 8 tpi spindle, 8 tpi is not an industry standard. The standard for 1 1/4 threads is 7 threads per ince. Therefore, an 8 tpi nut is a special specification, very expensive and hard to find.
Instead, taps are available for 1″, 1 1/4″, and M33 spindles. Direct threaded into a block of inexpensive poplar is quicker than embedding a nut in wood. Poplar performs well for all my projects.
I’ll show you mine – Please show me yours.
Enjoy!
Live Edge Woodturning – Apple and Pear Box
This video is best viewed with the control above. In case of difficulty, it is also posted on YouTube (link) and FaceBook.
Sometime ago after some annual pruning, I saved an apple limb. Shortly afterwards, I cut it into smaller sections and cored out the pith and center. Then left it to dry.
Now, it is dry and ready to become a box. I only need to refine the inside, add a bottom, and form a top. The bottom is walnut, the lid is pear. All finished with walnut oil then buffed.
The box is about 3.5 inches in diameter and 5 inches tall.
The video where the limb was cored is here:
Preparing Green Apple Branch For Natural Edge Projects
Enjoy!
Shocking End To Bandsaw Wood Preparation
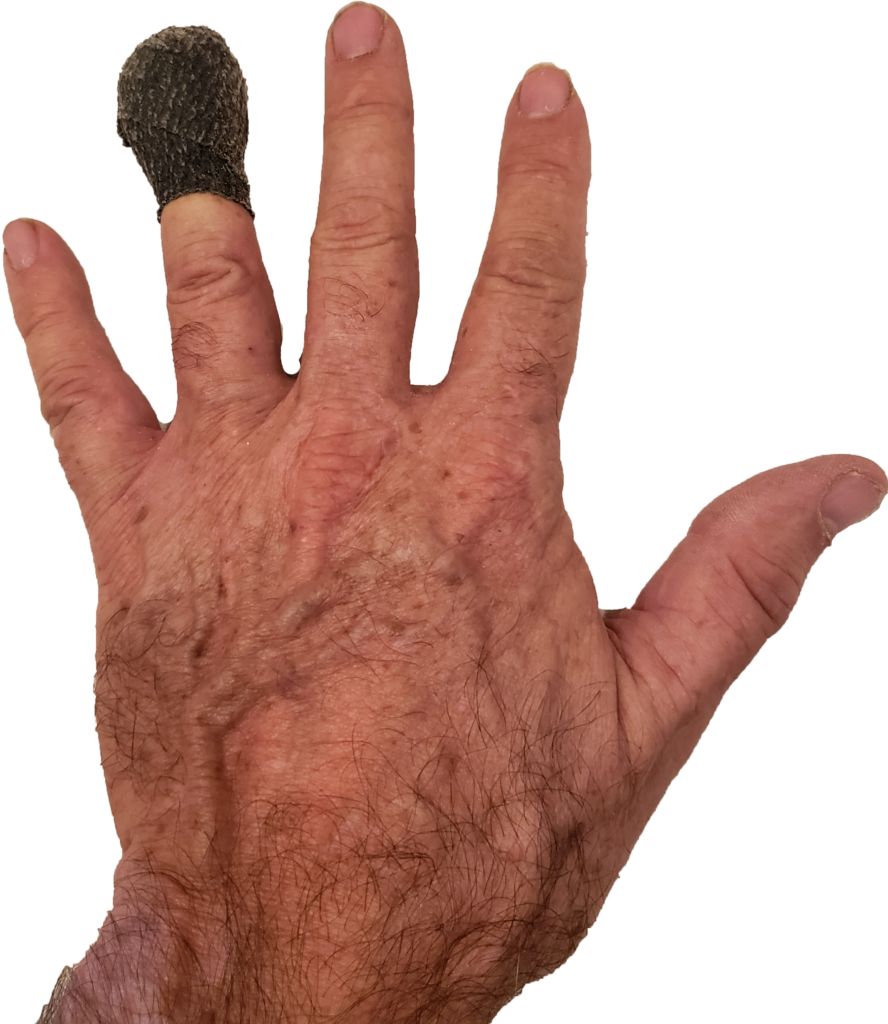
Best video viewing is right here. But, in case of difficulty, the video is also posted on YouTube and FaceBook
I accidentally cut my finger on my bandsaw but not where most of injury is. I did not see the risk near the power shutoff. Next to the off button is the return channel for the blade. This channel is open wide enough that a finger can accidentally hit the saw blade.
I had to have three stitches on my left ring finger.
For now, I am covering the return blade channel with duct tape to prevent a future repeat occurrence.
Enjoy!
Mousing Around With Woodturning – How To Capture A Mouse

This post is best viewed above here. In case of difficulty, it is also posted on YouTube and FaceBook.
I want to turn a couple of mice refrigerator magnets for small gifts. A mouse is not a mouse without a long tail. In the past I would turn a mouse and then figure out how to drill a hole in its backside for a tail.
With some advance planning, holding a mouse becomes almost trivial. But holding a mouse on a wood lathe is not the whole story. There are a couple more operations off the lathe where holding a small round mouse is important for the safety of both the mouse and me – the operator.
Let’s see what they are.
BTW my sanding pad is also mounted to my lathe using a #2 Morse taper collet to hold the 1/4″ shank of my sanding pad. Then a piece of 3/8″ all thread serves as a drawbar to keep the collet and pad secure in the lathe spindle.
Enjoy!
Woodturning Top With Spin Platform and Box
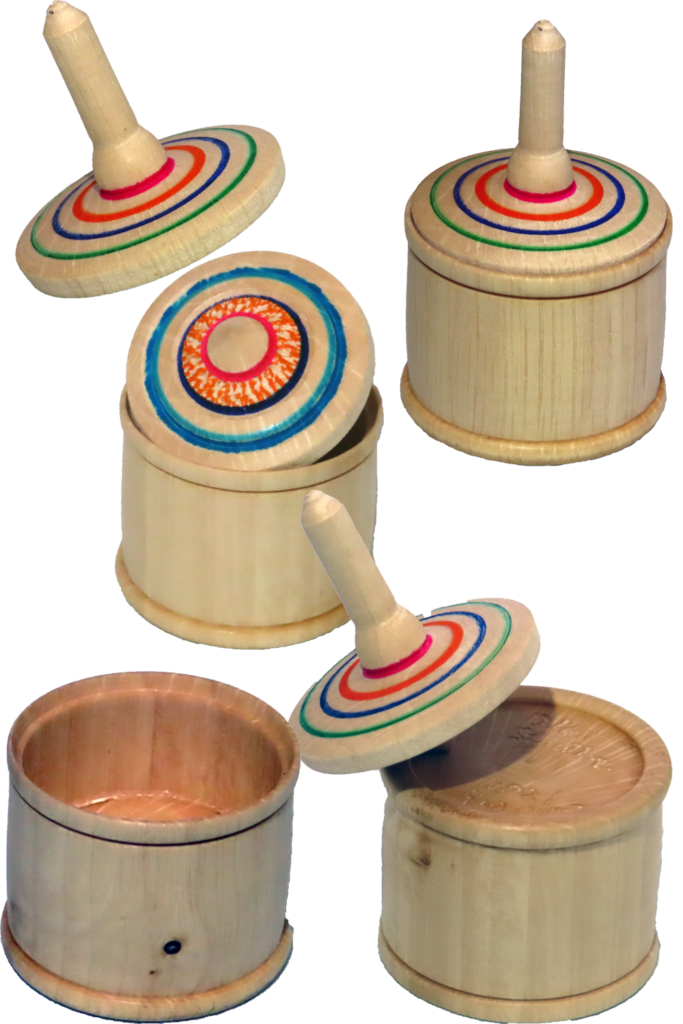
Best viewed by enabling the video above. In case of difficulty, this is also posted on YouTube and FaceBook.
Why turn a top by itself. When spinning, a top is fun and colorful. But, when not spinning, it just lays around looking weird.
Why not make the top the lid to a small box? Now it can look nice and a small treat be inside.
A bonus. When the box is inverted, it is a platform for a spinning performance.
I first saw this project turned by Eli Avisera.
Enjoy!
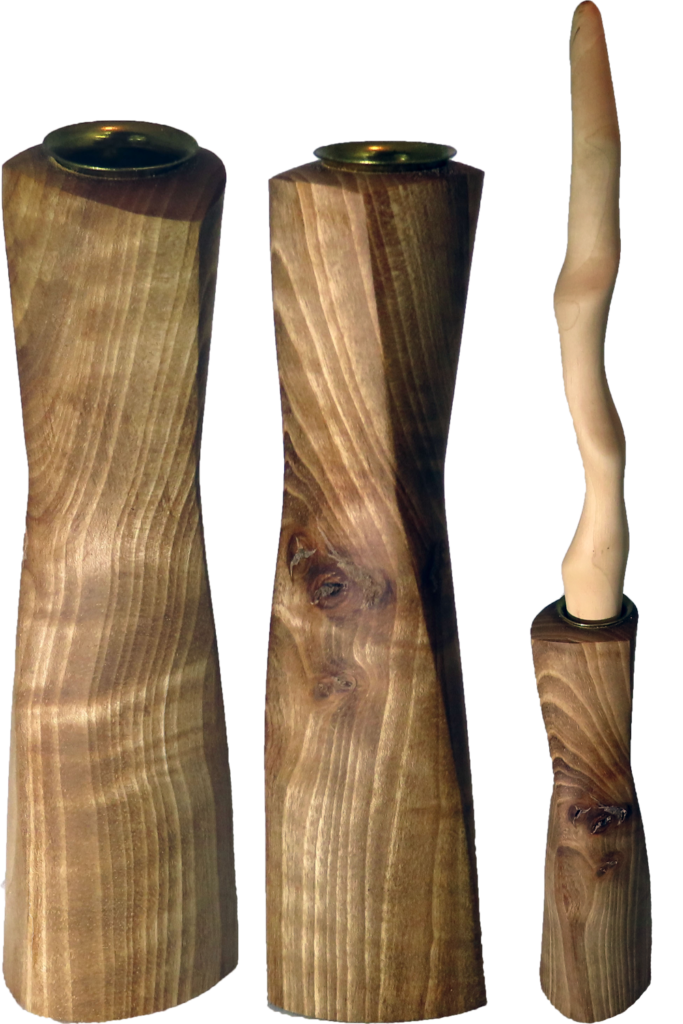
Woodturning Eccentric Multi-Axis Candle

In case you cannot view this video right here, it is also posted on YouTube and FaceBook.
What is the sense of turning an eccentric candlestick without a candle – especially and eccentric candle.
The two candlesticks are turned with a twist for a unique look. For this candle, I did not want a twist. It still has three eccentric axes. However, this time the axes are parallel – not skew.
The wood is hazelnut which I prize as a very white wood. It is finished with walnut oil. It is about 12 inches tall.
Please check out the last two eccentric videos.
Enjoy!
Revisit Eccentric Multi Axis Candlestick – With Jigs
In case you cannot view this post here, it is also posted on YouTube, and FaceBook.
After last week’s experience with eccentric turning, aka scary turning, I needed to turn yet another. This time with a couple of improvements.
One improvement was to have end plugs. Each plug has a tenon that fits the hole for either the metal cup or the ballast hole. On the other side, are holes for the centers to seat in. These hole give more stability to the skewed seat of the drive and live centers. These center tend to jump out due to the angles involved. With the plug there are more stable.
The second improvement was a shop-made measuring jig. A pair of dowels run between two ends designed to seat on the tenon I cut on the project spindle. A center dowel can be positionned anywhere on the dowels to measure depth of cut relative to previous settings.
In this project, three additional axes are used. All are offset from the center out to about 3/8″ in from the edge. One end is also twisted about 60 degrees.
This butternut candlestick is about 8″ tall and 2″ diameter, finished with walnut oil and buffed. A metal cup protects the wood from candle flame.
I will show the candle in next week’s video.
Enjoy!