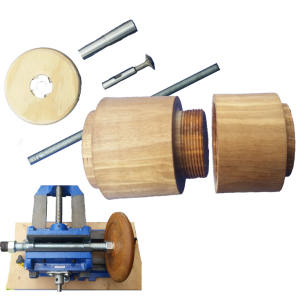
DIY Threading Jig For Common Wood
 This video is also posted to YouTube, Vimeo, and FaceBook. Same video – best right here.
I’ve been on a quest to thread wood for many, many years. I even purchased a Beall tap and die set for simple nut and bolt projects. Very NOT satisfied.
I’ve even tried to design and built my own threading jig. My problem was how to connect commercial all thread to a chuck. By the time I hired a machinist to make one, I could buy an expensive threading jig directly.
I gave up and purchase hand chase tools. However, they’re best used on expensive exotic wood that don’t quite fit my budget.
Until Dennis Paullus presented at the Utah Woodturning Symposium. His diagram included the missing link. A commercial adapter from 3/4-16tpi to 1-8tpi. I had to order the parts. This project is to successfully thread a project in gum wood.
My process:
- Prepare the box top and bottom.
- Drill out the box top. Saturate with thin CA
- Thread the female threads. Multiple light passes required until the threads are consistently peaked. If the wood is brittle and chipping, treat with with CA with each pass.
- When threads are acceptable, again treat with thin CA and make one more pass.
- Lightly sand off the threads, chamfer the front corner. Lubricate the threads.
- Estimate the size of the base tenon. From the inner diameter of the female threads, add an ample amount as the estimate.
- Prepare the tenon to this size and chamfer the leading corner. Cut a shallow valley about the width of the cutter at the base of the tenon with depth about the depth of threads. Don’t sweat it, it can be cut or refined later.
- Saturate the wood with CA as above.
- To thread, take very light passes, testing the fit with each pass until the top fits the bottom. Make one last application of CA, and take another threading pass as the same settings.
- Clean up the male threads by lightly sanding, chamfering the leading edge, and recutting the valley at the base of the tenon until the top threads completely to the bottom. Lubricate the threads
- Adjust the grain orientation if desired.
My Parts List:
- 12 Inches Allthread 3/4″-16tpi Zinc Plated – any bolt/nut supplier
- 5 3/4″ – 16 tpi Nut Zinc – any bolt/nut supplier
- 9 Inches Allthread 3/8″-16 tpi – any bolt/nut supplier
- 1 Steel Threaded Insert 1″-8tpi outside 3/4″-16tpi inside – McMaster Carr pn: 90248A088 $13.88 for 5 pack OR
- OR 1 Internal Spindle Adapter 1″-8tpi outside 3/4″-16tpi inside – Penn State pn: LA3418X $9.95
- 1 3/4″ x 3/16″ 60 Degree HSS Double Angle Cutter – MSC Direct.com pn: 03196052
- 1 Collet, 2MT, 3/8″ – Little Machine Shop.com pn: 1749
- 1 3/8″ T-nut
- 6 in. Cross Slide Vise – Harbor Freight pn: 32997
Optional
- 2 magnetic clamps – Mag Switch
- A denture brush makes a great thread cleaning tool.
Use the lathe banjo as a stop to reposition the jig between passes.
Enjoy!
Awesome Alan! Thanks for this instructive video. I look forward to trying to replicate your setup. Off to Harbor Fright!
Lou