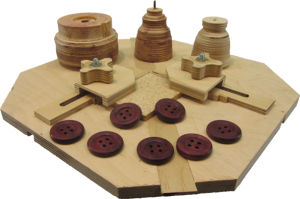
Faceplates and Drill Press Jig for Handcrafted Wood Buttons
 When Jari Hirvonen from Finland, asked how to make wood buttons, I had to pause and reflect, “What could be so hard about a wooden button?” The challenge is not in the individual buttons but in making them consistent with each other in pattern, hole positioning, and diameter. Very different from a one-off turning or even a series of similar turnings that never are used together.
I must credit a AAW discussion forum for highlighting the core problem: Consistent hole placement. But short of precisely measuring each hole and making sure the drill bit hits that spot – what is a woodturner to do?
My first thought was to use stops on the drill press. Even these seem to lack the precision that would be required.
Finally the epiphany, use spacers on each wing of a right angled fence. The width of the spacers would be the distance between holes. Great, now I just need something to hold the button blank down while drilling the holes and by the way, how do you turn them evenly and consistently.
As my thoughts evolved, I hit upon a solution that grew into a system.
- Modify the spacers to be exactly one half the distance between the holes. Now it would take two spaces to position each corner hole. The new spacers could be used to drill a consistent center hole. But I did not want a center hole in each button. Instead, drill the center hole on two waste blanks the size of the buttons and at least two corner holes.
- Now make wood faceplates: one for the spindle and one for the tail stock. I prefer threaded faceplates as shown in a recent video. Glue one of the drilled waste blocks to each faceplate. Use the center hole in the waste block to align it to the faceplates. Now we’re cooking.
- Next, stack up all the drilled button blanks on two brass rods. The rods are the same size as the holes in the buttons. The rods go thru opposing holes in the button blanks.
- Insert this stack into the corresponding holes in the faceplates. Note that everything is indexed to the spindle axis using those holes in the waste blocks.
- Turn the stack of button blanks as a single column. Watch out for short grain tear out. Near completion of the column, glue some sandpaper to a scrap block and sand the column. No need for fine grit sandpaper as the rims will be finished later. At this point, aim for a consistent diameter for the column of button blanks.
- Create a jamb chuck with a recesss sized to fit the newly rounded button blanks. (Remember the consisten diameter – I hope you measured it)
- Turn the face and backside of each button. This goes fast. Just watch out for tearout over the button holes. There’s a lot of fragile short grain. Try shear scraping. Don’t worry about the rim. Tooling the rim will just ruin the jamb chuck.
- Now take the spindle faceplate from #2 and reduce its diameter enough to have access to the entire rim area front and back of the button.
- Put short brass rods in opposing holes in the faceplate and mount a button to the faceplate. Bring up the tailstock to securing it. If you’re careful to keep pressure on the button, you can remove the tailstock for final sanding and finishing.
That’s it – an integrated system where the jig, faceplates, and chucks work together to deliver a consistent and beautiful results.
Free Sketchup models of the handcrafted button system are available at http://www.AsWoodTurns.com/ButtonJig
Link for Sketchup button system didn’t work. Would you please send the file to me. I really enjoy your Youtube teaching. I have been a turner for a while but, there is always something new to learn. Thanks
I sent you a separate email with a link to the file.
Enjoy.
Alan