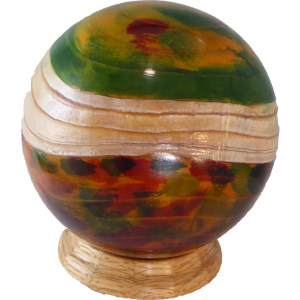
Woodturning A Perfect Sphere Into A Strata-Sphere
 This video is also available on YouTube, Vimeo, and FaceBook. Best right here.
I am inspired by the great work I saw at the Utah Woodturning Symposium. My way to praise some of the work is to emulate it. Such is the case with this sphere inspired by Vivien Grandoullier from the Instant Gallery. Essentially, I’m elevating a perfect sphere to a higher level.
But first I had to turn a perfect sphere from cedar using the octagon method. The octagon method helps to define the relative dimensions so that my eye is more easily guided to a perfect ball.
A little math yields two critical measures for the octagon. Starting with a cylinder, measure the diameter. Mark the diameter on the surface of the octagon, allowing for waste on the right end. Now two lines have defined the length of a cylinder equal to the diamter – the beginnings of s sphere.
Next mark a line in from each end mark a distance equal to 0.293 times the diamter. These two lines define the length of the side of the octagon and form its corners. Check this distance by multiplying 0.414 times the diameter. This is the length of one side.
Next waste off the wood outside the two outer lines down to a diameter equal to the length of one side (0.414 x diamter). At this point there is a tenon on both ends of your cylinder.
Remove the wood from each inner line at a 45 degree angle down to the corner formed by the spindle. This nearly completes the octagon except for the opposing spindles.
Now waste away as much of the spindle as possible while still supporting the work. If using a chuck, the entire right spindle can be removed.
Mark a line that divides each side of the octagon. If still mounted on a spindle, imagine the spot on the lathe’s axis in the center of the spindle.
Round off the wood between each of these new lines or end axis points. For the two ends, get as close as you can imagine.
Draw a line at the equator of the ball.
Remove from the lathe and cut away the remaining left and right spindles.
Remount the ball to a cup faceplate and the live center with a 90 degree turn. Pad the live center with a rubber stopper to avoid marring the surface. Gradually scrape to remove the ghost image at the top of the ball while leaving the equator line. Mark a new equator line.
Rotate the sphere another 90 degrees so that the new equator runs from headstock to tailstock. Gradually scrape to remove the ghost image at the top of the ball while leaving the equator line. Mark a new equator line.
Rotate the sphere another 90 degrees (3rd rotation) so that the new equator runs from headstock to tailstock. Gradually scrape to remove the ghost image at the top of the ball while leaving the equator line. At this point, the sphere may be perfect. If not, then repeat the equator, turn, scrap process as many times as needed.
For sanding, follow the same rotation process with each sanding grit.
For decoration, I soda blasted following the grain around my ball. Then applied paint, dye, and lacquer for a finish.
My sphere is just under 5 inches in diameter
Enjoy!
A very neat project Alan! Thanks for posting this one. I’ve not tried turning a sphere. I’m looking forward to giving it a shot. I always learn something from your videos.